Building a Procedural Maze Generator in UE5 Blueprints — Part 2
Introduction
In Part 1, you built the foundation for your maze generator:
- project structure
- custom structs
- the main Blueprint
- variables
- HISM components
Now we are building the real logic.
By the end of this part, your system will:
- create a full grid of maze cells
- choose a starting cell
- search for valid unvisited neighbors
- remove walls between connected cells
- backtrack when needed
- generate a complete maze in memory
Nothing will be visible yet. That happens in Part 3.
What We Are Building in This Part
In this part, we will create:
- the
InitializeGridfunction - the
GetUnvisitedNeighborshelper function - the
RemoveWallBetweenhelper function - the
GenerateMazefunction - the Construction Script flow that calls everything in order
This is the brain of your maze generator.
Before You Start
You should already have:
BP_MazeGeneratorS_MazeCellS_NeighborInfo
And these variables from Part 1:
MazeWidthMazeHeightCellSizeMazeSeedMazeGridRandomStream
You should also already have these components:
FloorHISMWallHISM- If anything is missing, go back to Part 1 before continuing.
Step 1 — Build the Construction Script Setup
Before we create the maze functions, we need to prepare the Construction Script. At the top of the Blueprint editor, you will see tabs. Click the Construction Script tab. If you don’t see it, look in the My Blueprint panel under Functions and double-click Construction Script.
What this step does
This step sets up the Construction Script so it:
- clears old mesh instances
- clears old maze data
- creates a seeded random stream
- prepares to call the maze generation functions later
This makes sure every rebuild starts clean.
Instructions
Step 1.1 — Open the Construction Script
Step 1.1.1 — Open the Blueprint
-
Open
BP_MazeGenerator -
In the left panel, click:
Construction Script
Step 1.2 — Clear old floor instances
Step 1.2.1 — Add the FloorHISM clear node
-
Drag
FloorHISMfrom the Components panel into the graph. -
Drag from the
FloorHISMpin -
Search for:
Clear Instances -
Click:
Clear Instances
Step 1.3 — Clear old wall instances
Step 1.3.1 — Add the WallHISM clear node
-
Drag
WallHISMfrom the Components panel -
Drag from the
WallHISMpin -
Search for:
Clear Instances -
Click:
Clear Instances
Step 1.3.2 — Connect execution flow
-
Connect the white execution pin from:
Construction Scriptto
Clear InstancesonFloorHISM -
Connect the white execution pin from:
Clear InstancesonFloorHISMto
Clear InstancesonWallHISM
Step 1.4 — Clear the MazeGrid array
Step 1.4.1 — Add the Clear node
-
Drag
MazeGridinto the graph. When dragging a variable into the graph, a small menu will appear asking Get or Set. Choose Get here. -
Drag from the
MazeGridpin -
Search for:
Clear -
Click:
Clear
Beginner note
Use plain Clear here because MazeGrid is an array.
Do NOT use Clear Instances.
Clearremoves all items from an arrayClear Instancesremoves spawned mesh instances from an HISM component
So:
MazeGrid→ useClearFloorHISM/WallHISM→ useClear Instances
Step 1.4.2 — Connect execution flow
-
Connect the white execution pin from:
Clear InstancesonWallHISMto
ClearonMazeGrid
Step 1.5 — Create and store the RandomStream
Step 1.5.1 — Create the stream
-
Drag
MazeSeedinto the graph. When dragging a variable into the graph, a small menu will appear asking Get or Set. Choose Get here. -
Drag from the
MazeSeedpin -
Search for:
Make Random Stream -
Click:
Make Random Stream
Step 1.5.2 — Store the stream
-
Drag
RandomStreaminto the graph as Set -
Connect the output of
Make Random Streaminto the value pin onSet RandomStream
Pro tip: If you drag
RandomStreamand drop it on theReturn Valuepin, Blueprints will create the Set node automatically.
Step 1.5.3 — Connect execution flow
-
Connect the white execution pin from:
ClearonMazeGridto
Set RandomStream
Connections recap
Execution flow:
Construction Script → Clear Instances (FloorHISM) → Clear Instances (WallHISM) → Clear (MazeGrid) → Set RandomStream
Data flow:
FloorHISM→Clear InstancesWallHISM→Clear InstancesMazeGrid→ClearMazeSeed→Make Random StreamMake Random Stream→Set RandomStream
Why this matters
If you skip this setup:
- old mesh instances can stack up
- old grid data can remain in memory
- your random results will not be controlled by the seed
This setup gives you a clean and repeatable starting point every time the Blueprint rebuilds.
Common mistakes
❌ Using Clear on an HISM component
✔️ Use Clear Instances
❌ Dragging FloorHISM or WallHISM in as Set
✔️ Drag them in as Get
❌ Forgetting to store the random stream
✔️ The result of Make Random Stream must go into Set RandomStream
Expected result
Your Construction Script now:
- clears previous mesh instances
- clears old maze data
- stores a seeded random stream
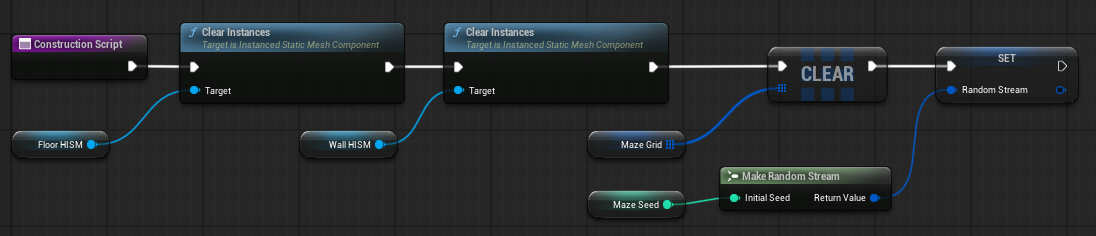
Step 2 — Create the InitializeGrid Function
Now we will build the function that creates every maze cell.
What this step does
This function creates a full grid of S_MazeCell structs and stores them in MazeGrid.
Each cell begins as:
- unvisited
- fully enclosed by walls
This gives the maze generator a clean starting state.
Instructions
Step 2.1 — Create the function
Step 2.1.1 — Add the function
-
In the My Blueprint panel, find Functions
-
Click the + Function button
-
Name the function:
InitializeGrid -
Press Enter
Step 2.2 — Clear the MazeGrid array inside the function
Step 2.2.1 — Add the Clear node
-
Drag
MazeGridinto the graph as Get -
Drag from the
MazeGridpin -
Search for:
Clear -
Click:
Clear
Step 2.2.2 — Connect execution flow
-
Connect the white execution pin from:
InitializeGridto
ClearonMazeGrid
Step 2.3 — Add a For Loop
Step 2.3.1 — Add the loop node
-
Right-click in empty graph space
-
Search for:
For Loop -
Click:
For Loop
Step 2.3.2 — Connect execution flow
-
Connect the white execution pin from:
ClearonMazeGridto
For Loop
Step 2.4 — Calculate the Last Index
We want the loop to run once for every cell in the maze.
Step 2.4.1 — Multiply width and height
-
Drag
MazeWidthinto the graph as Get -
Drag
MazeHeightinto the graph as Get -
Drag from
MazeWidth -
Search for:
* -
Choose:
Integer * Integer -
Connect:
MazeWidth→ first inputMazeHeight→ second input
Step 2.4.2 — Subtract 1 for the last valid index
-
Drag from the result of the multiply node
-
Search for:
- -
Choose:
Subtract -
Set the second input to:
1
Beginner note
MazeWidth × MazeHeightgives the total number of cells in the maze.
But arrays start counting at
0.
So if the maze has 100 cells, the indexes go from:
0to99
That means the last valid index is:
Total Cells - 1
This prevents the loop from trying to use an index that does not exist.
Step 2.4.3 — Connect to the For Loop
- Connect the result into:
For Loop.Last Index
- Set:
For Loop.First Index = 0
Step 2.5 — Calculate Row
Step 2.5.1 — Divide by MazeWidth
-
Drag from the
Indexpin on theFor Loop -
Search for:
/ -
Choose:
Divide -
Drag another
MazeWidthinto the graph as Get -
Connect:
Index→ first inputMazeWidth→ second input
This gives you:
Row = Index / MazeWidth
Step 2.6 — Calculate Col
Step 2.6.1 — Use modulo with MazeWidth
- Drag from the
Indexpin again
You can drag multiple connections from the same output pin, just drag from it again.
-
Search for:
% -
Choose:
Percent (Integer) -
Drag another
MazeWidthinto the graph as Get -
Connect:
Index→ first inputMazeWidth→ second input
This gives you:
Col = Index % MazeWidth
Note: I did not need to drag in another MazeWidth. I could have used the one I dragged in earlier a second time. But I am adding another because it makes a cleaner screenshot when you don’t have wires crossing all over the place.
Beginner note
The
%(modulo) operator gives the remainder after division.
This is how we convert a single index into a column.
Example:
If
MazeWidth = 10:
- Index 0 →
0 % 10 = 0- Index 7 →
7 % 10 = 7- Index 10 →
10 % 10 = 0(new row starts)- Index 13 →
13 % 10 = 3
So
% MazeWidthgives you the position across the row (the column).
Step 2.7 — Create the MazeCell struct
Step 2.7.1 — Add the Make S_MazeCell node
-
Right-click in empty graph space
-
Search for:
Make S_MazeCell -
Click:
Make S_MazeCell
Step 2.7.2 — Connect the position data
- Connect:
- the divide result →
Row - the modulo result →
Col
Step 2.7.3 — Set default values
- Confirm the default values are already set correctly. These should match what you defined in S_MazeCell in Part 1:
bVisited = FalsebWallNorth = TruebWallEast = TruebWallSouth = TruebWallWest = True
Step 2.8 — Add the cell to MazeGrid
Step 2.8.1 — Add the Add node
-
Drag
MazeGridinto the graph as Get -
Drag from the
MazeGridpin -
Search for:
Add -
Click:
Add
Step 2.8.2 — Connect execution and data
-
Connect the white execution pin from:
For Loop.Loop Bodyto
Add -
Connect:
Make S_MazeCell→Add.Item
Connections recap
Execution flow:
InitializeGrid → Clear (MazeGrid) → For Loop → Add to MazeGrid
Data flow:
MazeWidth × MazeHeight - 1→For Loop.Last IndexFor Loop.Index / MazeWidth→RowFor Loop.Index % MazeWidth→ColRowandCol→Make S_MazeCellMake S_MazeCell→MazeGrid.Add
Why this matters
This function builds the entire maze structure in memory before the maze algorithm runs.
Every cell now has:
- a row
- a column
- an unvisited state
- all four walls still intact
This is the starting point the algorithm expects.
Common mistakes
❌ Setting Last Index to MazeWidth * MazeHeight
✔️ Use MazeWidth * MazeHeight - 1
❌ Mixing up Row and Col
✔️ Row uses division, Col uses modulo
❌ Forgetting to add the struct into MazeGrid
✔️ Make S_MazeCell must connect into Add.Item
❌ Picking For Loop With Break instead of For Loop
✔️ Make sure you pick For Loop
Expected result
Your InitializeGrid function now creates a full array of maze cells.
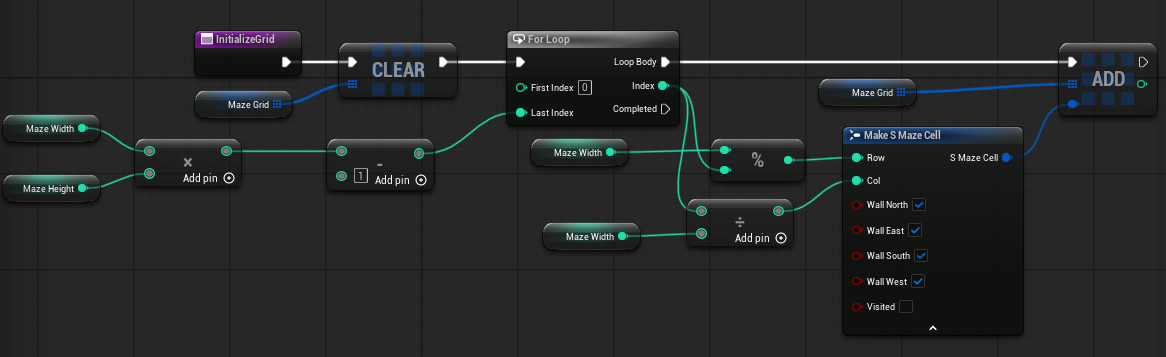
Step 3 — Create the GetUnvisitedNeighbors Function
Now we need a helper function that checks which neighboring cells are still valid moves.
What this step does
This function checks the four directions around the current cell and returns only neighbors that are:
- inside the maze bounds
- not already visited
It returns them as an array of S_NeighborInfo.
This is how the maze generator decides where it can go next.
Coordinate system used in this function
Before building this function, it helps to understand the direction convention:
| Direction | DeltaX | DeltaY | Index change |
|---|---|---|---|
| North | 0 | -1 | − MazeWidth |
| East | 1 | 0 | + 1 |
| South | 0 | 1 | + MazeWidth |
| West | -1 | 0 | − 1 |
You will use these values when creating
S_NeighborInfostructs for each direction.
Instructions
Step 3.1 — Create the function
Step 3.1.1 — Add the function
-
In the My Blueprint panel, find Functions
-
Click the + button next to Functions
-
Name the function:
GetUnvisitedNeighbors -
Press Enter
Step 3.2 — Add input and output
Step 3.2.1 — Add the input
-
In the Details panel for the function, find Inputs
-
Click the + button
-
Name it:
CurrentIndex -
Set the type to:
Integer
Step 3.2.2 — Add the output
-
In the Details panel, find Outputs
-
Click the + button
-
Name it:
Neighbors -
Set the type to:
Array of S_NeighborInfo
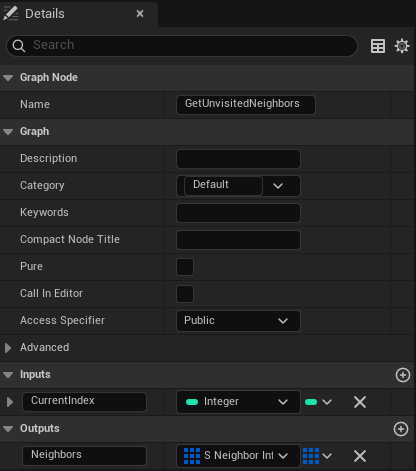
Step 3.3 — Add local variables
Local variables only exist inside this function. They are added differently from regular Blueprint variables.
Step 3.3.1 — Find the Local Variables section
-
Look in the My Blueprint panel
-
Find the section labeled:
Local Variables
This section only appears when you are inside a function graph. If you do not see it, make sure you have the
GetUnvisitedNeighborsgraph open.
Step 3.3.2 — Add the local variables
-
Click the + button next to Local Variables
-
Add the following one at a time:
CurrentRow(Integer)CurrentCol(Integer)LocalNeighbors(Array ofS_NeighborInfo)TestIndex(Integer)
TestIndexwill be reused for each direction. This is safe because each direction’s logic completes fully before the next one begins.
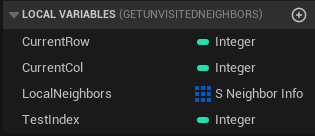
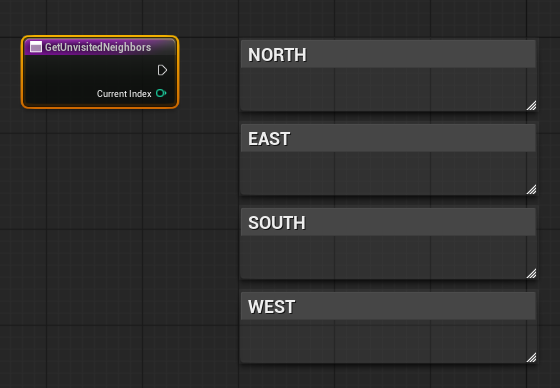
Step 3.4 — Add comment boxes
Before placing any nodes, you will set up comment boxes to keep the graph organised.
Comment boxes let you label groups of nodes so you can always tell which direction you are working on.
Step 3.4.1 — Add the North comment box
-
Left-click and drag in empty graph space to select an area
-
Press C
-
A comment box will appear
-
Name it:
North
Step 3.4.2 — Add the remaining comment boxes
-
Repeat this process three more times, placing each box to the right of the previous one
-
Name them:
EastSouthWest
You do not need to be precise yet. You can resize and reposition comment boxes at any time by dragging their edges or title bar.
Step 3.5 — Calculate CurrentRow and CurrentCol
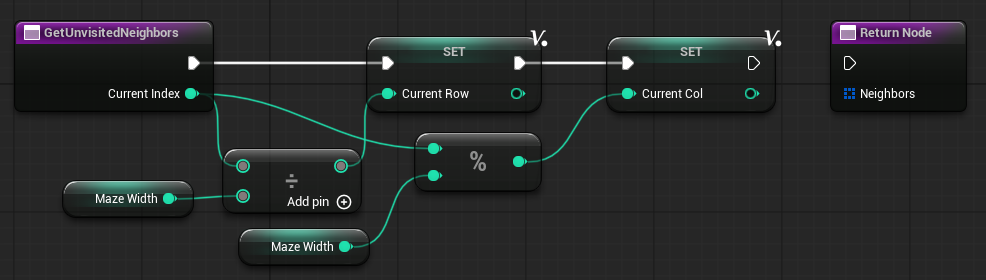
Step 3.5.1 — Calculate CurrentRow
-
From the function entry node, drag from:
CurrentIndex -
Search for:
/ -
Choose:
Divide -
Drag
MazeWidthinto the graph as Get - Connect:
MazeWidth→ second input of/
-
Drag
CurrentRowinto the graph as Set -
Connect the division result into
Set CurrentRow -
Connect the white execution pin from:
GetUnvisitedNeighbors(function entry node)to
Set CurrentRow
Step 3.5.2 — Calculate CurrentCol
-
From the function entry node, drag from:
CurrentIndex -
Search for:
% -
Choose:
Percent (Integer) -
Drag
MazeWidthinto the graph as Get - Connect:
MazeWidth→ second input of%
-
Drag
CurrentColinto the graph as Set -
Connect the modulo result into
Set CurrentCol -
Connect the white execution pin from:
Set CurrentRowto
Set CurrentCol
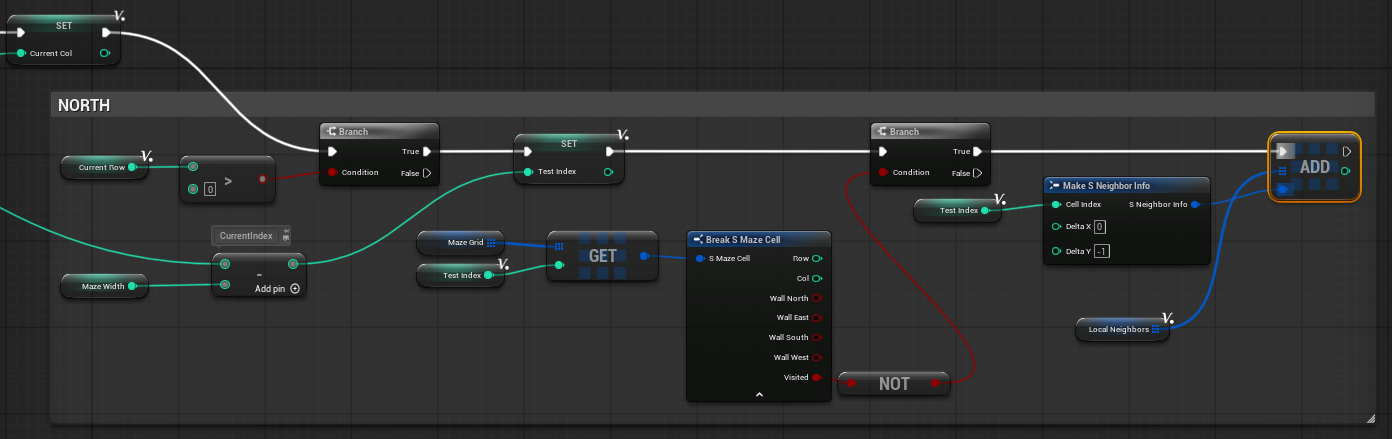
Step 3.6 — Check the North neighbor
Use this pattern for North:
CurrentRow > 0
→ TestIndex = CurrentIndex - MazeWidth
→ MazeGrid[TestIndex]
→ NOT bVisited
→ Make S_NeighborInfo (DeltaX=0, DeltaY=-1)
→ Add to LocalNeighbors
What this step does
This section checks if there is a valid cell above (North) the current cell.
If that neighbor:
- exists inside the maze
- has NOT been visited
then it is added as a valid movement option.
IMPORTANT — Execution Flow
This is the first direction check and establishes the pattern all other directions follow:
- DO NOT use a Sequence node
- execution must continue whether North is valid or not
Place all nodes for this section inside the North comment box.
Step 3.6.1 — Check north bounds
-
Drag
CurrentRowinto the graph as Get -
Drag from the
CurrentRowpin -
Search for:
> -
Choose:
Greater -
Set the second input to:
0 -
Right-click in empty graph space
-
Search for:
Branch -
Choose the plain:
Branch
Do not choose Branch (Enum) or any other variant.
-
Connect the white execution pin from:
Set CurrentColto
Branch(North bounds check) -
Connect:
CurrentRow > 0→Branch.Condition
Step 3.6.2 — Calculate TestIndex
-
From the function entry node, drag from:
CurrentIndex -
Search for:
- -
Choose:
Subtract -
Drag
MazeWidthinto the graph as Get - Connect:
MazeWidth→ second input of-
-
Drag
TestIndexinto the graph as Set -
Connect the subtraction result into
Set TestIndex -
Connect the white execution pin from:
Branch.True(North bounds check)to
Set TestIndex
Step 3.6.3 — Read the North cell
-
Drag
MazeGridinto the graph as Get -
Drag from the
MazeGridpin -
Search for:
Get (a copy) -
Click:
Get (a copy) -
Drag
TestIndexinto the graph as Get - Connect:
TestIndex→IndexonGet (a copy)
-
Drag from the output of
Get (a copy) -
Search for:
Break S_MazeCell -
Click:
Break S_MazeCell
Step 3.6.4 — Check if North is unvisited
-
Drag from the
bVisitedpin onBreak S_MazeCell -
Search for:
NOT Boolean -
Click:
NOT Boolean -
Right-click in empty graph space
-
Search for:
Branch -
Choose the plain:
Branch -
Connect the white execution pin from:
Set TestIndexto
Branch(North visited check) -
Connect:
NOT Booleanresult →Branch.Condition(North visited check)
Step 3.6.5 — Add the North neighbor
-
Right-click in empty graph space
-
Search for:
Make S_NeighborInfo -
Click:
Make S_NeighborInfo -
Drag
TestIndexinto the graph as Get - Connect:
TestIndex→CellIndex
- Set:
DeltaX = 0DeltaY = -1
-
Drag
LocalNeighborsinto the graph as Get -
Drag from the
LocalNeighborspin -
Search for:
Add -
Click:
Add -
Connect the white execution pin from:
Branch.True(North visited check)to
Add - Connect:
Make S_NeighborInfo→Add.Item
The North section is now complete. The outgoing execution wires from this section will be connected in the next step when the East bounds Branch node has been created.
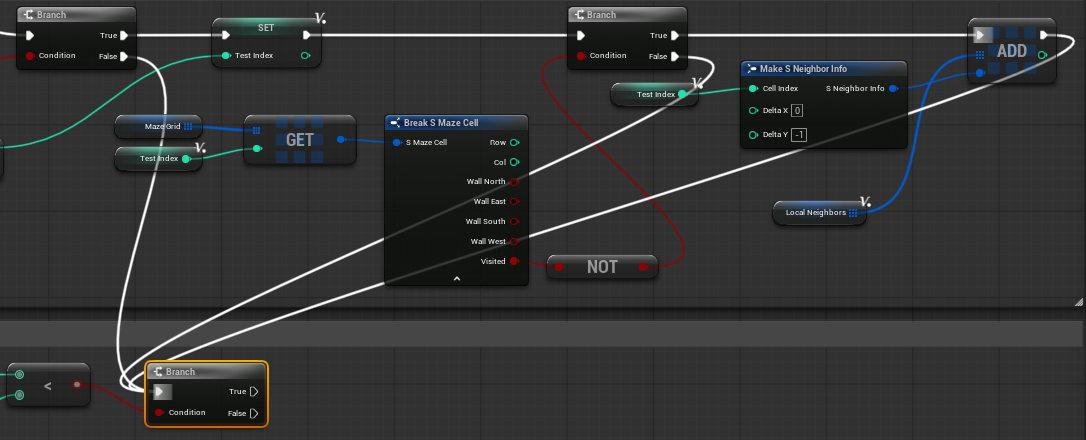
Step 3.7 — Check the East neighbor
Use this pattern for East:
CurrentCol < MazeWidth - 1
→ TestIndex = CurrentIndex + 1
→ MazeGrid[TestIndex]
→ NOT bVisited
→ Make S_NeighborInfo (DeltaX=1, DeltaY=0)
→ Add to LocalNeighbors
What this step does
This section checks if there is a valid cell to the right (East) of the current cell.
If that neighbor:
- exists inside the maze
- has NOT been visited
then it is added as a valid movement option.
Place all nodes for this section inside the East comment box.
Step 3.7.1 — Check east bounds
-
Right-click in empty graph space inside the East comment box
-
Search for:
Branch -
Choose the plain:
Branch -
Connect the white execution pin from:
Branch.False(North bounds check, inside the North comment box)to
Branch(inside the East comment box) -
Connect the white execution pin from:
Branch.False(North visited check, inside the North comment box)to
Branch(inside the East comment box) -
Connect the white execution pin from:
Addexec output (inside the North comment box)to
Branch(inside the East comment box) -
Drag
CurrentColinto the graph as Get -
Drag from the
CurrentColpin -
Search for:
< -
Choose:
Less -
Drag
MazeWidthinto the graph as Get -
Drag from the
MazeWidthpin -
Search for:
- -
Choose:
Subtract -
Set the second input to:
1 - Connect:
(MazeWidth - 1)result → second input of<
- Connect:
CurrentCol < MazeWidth - 1→Branch.Condition(East bounds check)
Step 3.7.2 — Calculate TestIndex
-
From the function entry node, drag from:
CurrentIndex -
Search for:
+ -
Choose:
Add -
Set the second input to:
1 -
Drag
TestIndexinto the graph as Set -
Connect the addition result into
Set TestIndex -
Connect the white execution pin from:
Branch.True(East bounds check)to
Set TestIndex
Step 3.7.3 — Read the East cell
-
Drag
MazeGridinto the graph as Get -
Drag from the
MazeGridpin -
Search for:
Get (a copy) -
Click:
Get (a copy) -
Drag
TestIndexinto the graph as Get - Connect:
TestIndex→IndexonGet (a copy)
-
Drag from the output of
Get (a copy) -
Search for:
Break S_MazeCell -
Click:
Break S_MazeCell
Step 3.7.4 — Check if East is unvisited
-
Drag from the
bVisitedpin onBreak S_MazeCell -
Search for:
NOT Boolean -
Click:
NOT Boolean -
Right-click in empty graph space
-
Search for:
Branch -
Choose the plain:
Branch -
Connect the white execution pin from:
Set TestIndexto
Branch(East visited check) -
Connect:
NOT Booleanresult →Branch.Condition(East visited check)
Step 3.7.5 — Add the East neighbor
-
Right-click in empty graph space
-
Search for:
Make S_NeighborInfo -
Click:
Make S_NeighborInfo -
Drag
TestIndexinto the graph as Get - Connect:
TestIndex→CellIndex
- Set:
DeltaX = 1DeltaY = 0
-
Drag
LocalNeighborsinto the graph as Get -
Drag from the
LocalNeighborspin -
Search for:
Add -
Click:
Add -
Connect the white execution pin from:
Branch.True(East visited check)to
Add - Connect:
Make S_NeighborInfo→Add.Item
The East section is now complete. The outgoing execution wires from this section will be connected in the next step when the South bounds Branch node has been created.
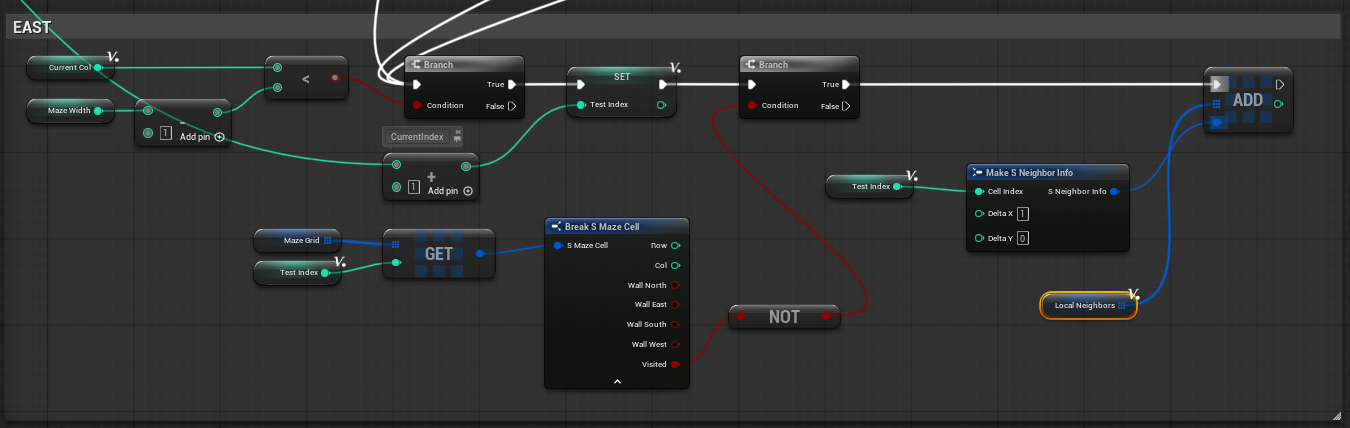
Step 3.8 — Check the South neighbor
Use this pattern for South:
CurrentRow < MazeHeight - 1 → TestIndex = CurrentIndex + MazeWidth → MazeGrid[TestIndex] → NOT bVisited → Make S_NeighborInfo (DeltaX=0, DeltaY=1) → Add to LocalNeighbors
What this step does
This section checks if there is a valid cell below (South) the current cell.
If that neighbor:
- exists inside the maze
- has NOT been visited
then it is added as a valid movement option.
Place all nodes for this section inside the South comment box.
Step 3.8.1 — Check south bounds
-
Right-click in empty graph space inside the South comment box
-
Search for:
Branch -
Choose the plain:
Branch -
Connect the white execution pin from:
Branch.False(East bounds check, inside the East comment box)to
Branch(inside the South comment box) -
Connect the white execution pin from:
Branch.False(East visited check, inside the East comment box)to
Branch(inside the South comment box) -
Connect the white execution pin from:
Addexec output (inside the East comment box)to
Branch(inside the South comment box) -
Drag
CurrentRowinto the graph as Get -
Drag from the
CurrentRowpin -
Search for:
< -
Choose:
Less -
Drag
MazeHeightinto the graph as Get -
Drag from the
MazeHeightpin -
Search for:
- -
Choose:
Subtract -
Set the second input to:
1 - Connect:
(MazeHeight - 1)result → second input of<
- Connect:
CurrentRow < MazeHeight - 1→Branch.Condition(South bounds check)
Step 3.8.2 — Calculate TestIndex
-
From the function entry node, drag from:
CurrentIndex -
Search for:
+ -
Choose:
Add -
Drag
MazeWidthinto the graph as Get - Connect:
MazeWidth→ second input of+
-
Drag
TestIndexinto the graph as Set -
Connect the addition result into
Set TestIndex -
Connect the white execution pin from:
Branch.True(South bounds check)to
Set TestIndex
Step 3.8.3 — Read the South cell
-
Drag
MazeGridinto the graph as Get -
Drag from the
MazeGridpin -
Search for:
Get (a copy) -
Click:
Get (a copy) -
Drag
TestIndexinto the graph as Get - Connect:
TestIndex→IndexonGet (a copy)
-
Drag from the output of
Get (a copy) -
Search for:
Break S_MazeCell -
Click:
Break S_MazeCell
Step 3.8.4 — Check if South is unvisited
-
Drag from the
bVisitedpin onBreak S_MazeCell -
Search for:
NOT Boolean -
Click:
NOT Boolean -
Right-click in empty graph space
-
Search for:
Branch -
Choose the plain:
Branch -
Connect the white execution pin from:
Set TestIndexto
Branch(South visited check) -
Connect:
NOT Booleanresult →Branch.Condition(South visited check)
Step 3.8.5 — Add the South neighbor
-
Right-click in empty graph space
-
Search for:
Make S_NeighborInfo -
Click:
Make S_NeighborInfo -
Drag
TestIndexinto the graph as Get - Connect:
TestIndex→CellIndex
- Set:
DeltaX = 0DeltaY = 1
-
Drag
LocalNeighborsinto the graph as Get -
Drag from the
LocalNeighborspin -
Search for:
Add -
Click:
Add -
Connect the white execution pin from:
Branch.True(South visited check)to
Add - Connect:
Make S_NeighborInfo→Add.Item
The South section is now complete. The outgoing execution wires from this section will be connected in the next step when the West bounds Branch node has been created.
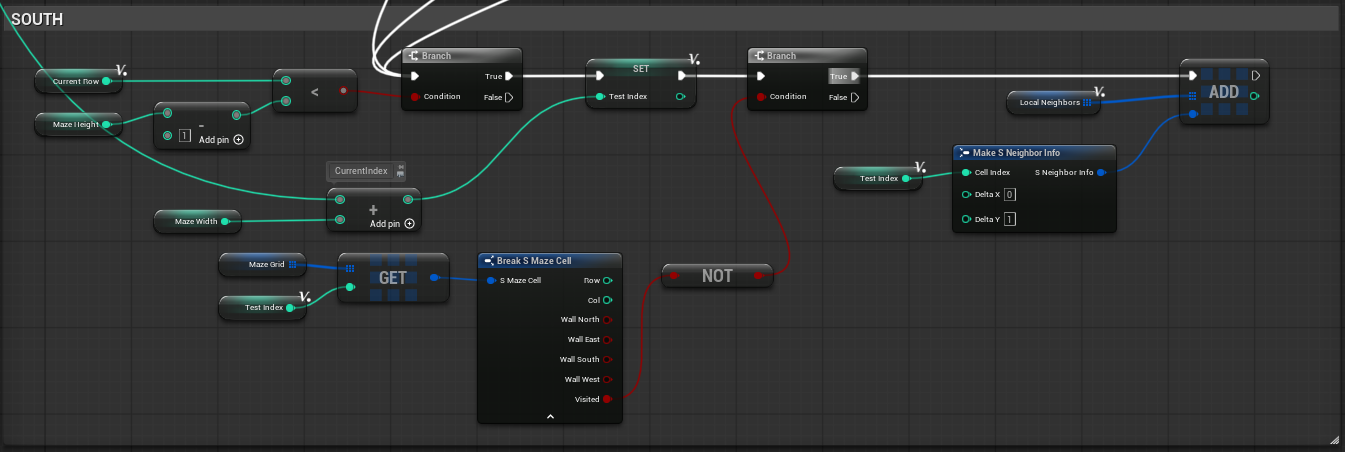
Step 3.9 — Check the West neighbor
Use this pattern for West:
CurrentCol > 0
→ TestIndex = CurrentIndex - 1
→ MazeGrid[TestIndex]
→ NOT bVisited
→ Make S_NeighborInfo (DeltaX=-1, DeltaY=0)
→ Add to LocalNeighbors
What this step does
This section checks if there is a valid cell to the left (West) of the current cell.
If that neighbor:
- exists inside the maze
- has NOT been visited
then it is added as a valid movement option.
Place all nodes for this section inside the West comment box.
Step 3.9.1 — Check west bounds
-
Right-click in empty graph space inside the West comment box
-
Search for:
Branch -
Choose the plain:
Branch -
Connect the white execution pin from:
Branch.False(South bounds check, inside the South comment box)to
Branch(inside the West comment box) -
Connect the white execution pin from:
Branch.False(South visited check, inside the South comment box)to
Branch(inside the West comment box) -
Connect the white execution pin from:
Addexec output (inside the South comment box)to
Branch(inside the West comment box) -
Drag
CurrentColinto the graph as Get -
Drag from the
CurrentColpin -
Search for:
> -
Choose:
Greater -
Set the second input to:
0 -
Connect:
CurrentCol > 0→Branch.Condition(West bounds check)
Step 3.9.2 — Calculate TestIndex
-
From the function entry node, drag from:
CurrentIndex -
Search for:
- -
Choose:
Subtract -
Set the second input to:
1 -
Drag
TestIndexinto the graph as Set -
Connect the subtraction result into
Set TestIndex -
Connect the white execution pin from:
Branch.True(West bounds check)to
Set TestIndex
Step 3.9.3 — Read the West cell
-
Drag
MazeGridinto the graph as Get -
Drag from the
MazeGridpin -
Search for:
Get (a copy) -
Click:
Get (a copy) -
Drag
TestIndexinto the graph as Get - Connect:
TestIndex→IndexonGet (a copy)
-
Drag from the output of
Get (a copy) -
Search for:
Break S_MazeCell -
Click:
Break S_MazeCell
Step 3.9.4 — Check if West is unvisited
-
Drag from the
bVisitedpin onBreak S_MazeCell -
Search for:
NOT Boolean -
Click:
NOT Boolean -
Right-click in empty graph space
-
Search for:
Branch -
Choose the plain:
Branch -
Connect the white execution pin from:
Set TestIndexto
Branch(West visited check) -
Connect:
NOT Booleanresult →Branch.Condition(West visited check)
Step 3.9.5 — Add the West neighbor
-
Right-click in empty graph space
-
Search for:
Make S_NeighborInfo -
Click:
Make S_NeighborInfo -
Drag
TestIndexinto the graph as Get - Connect:
TestIndex→CellIndex
- Set:
DeltaX = -1DeltaY = 0
-
Drag
LocalNeighborsinto the graph as Get -
Drag from the
LocalNeighborspin -
Search for:
Add -
Click:
Add -
Connect the white execution pin from:
Branch.True(West visited check)to
Add - Connect:
Make S_NeighborInfo→Add.Item
Step 3.10 — Return the result
Step 3.10.1 — Connect LocalNeighbors to the Return Node
The Return Node is automatically placed at the end of the function graph. Scroll to find it. Do not add a new one.
-
Drag
LocalNeighborsinto the graph as Get - Connect:
LocalNeighbors→Neighborson the Return Node
-
Connect the white execution pin from:
Branch.False(West bounds check, inside the West comment box)to
the Return Node
-
Connect the white execution pin from:
Branch.False(West visited check, inside the West comment box)to
the Return Node
-
Connect the white execution pin from:
Addexec output (inside the West comment box)to
the Return Node
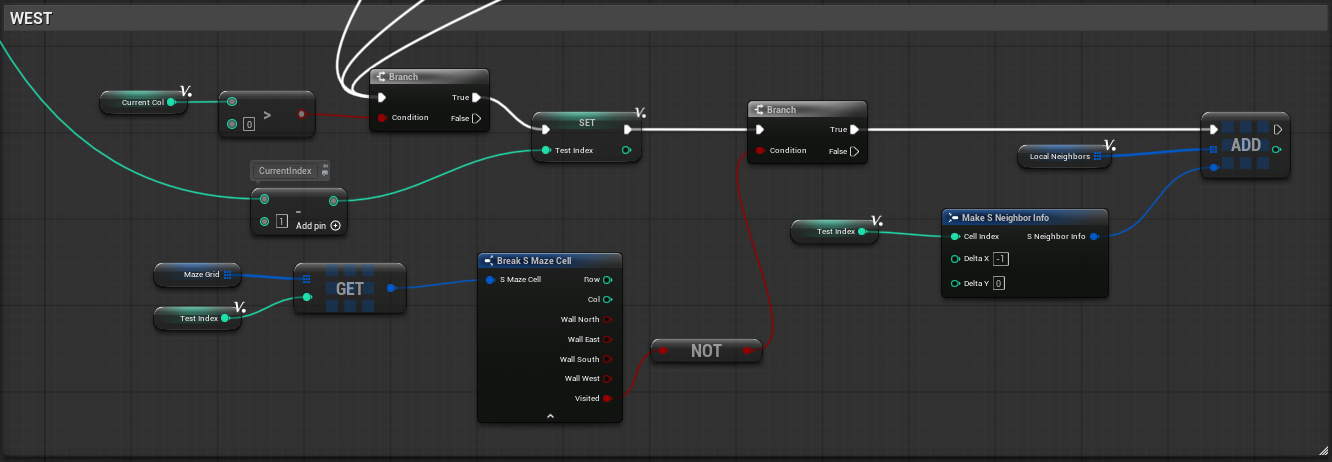
Step 3.11 — Review the full execution flow
When all four directions are connected, the full function flows like this:
Set CurrentRow
→ Set CurrentCol
→ [North comment box] Branch: CurrentRow > 0
→ [East comment box]  Branch: CurrentCol < MazeWidth - 1
→ [South comment box] Branch: CurrentRow < MazeHeight - 1
→ [West comment box]  Branch: CurrentCol > 0
→ Return Node
Within each comment box, if the bounds check passes:
Branch.True → Set TestIndex → Branch: NOT bVisited → Add to LocalNeighbors → next section
Branch.False → next section
Both paths from every Branch node must eventually reach the next section. If any wire is missing, the function will silently stop at that point.
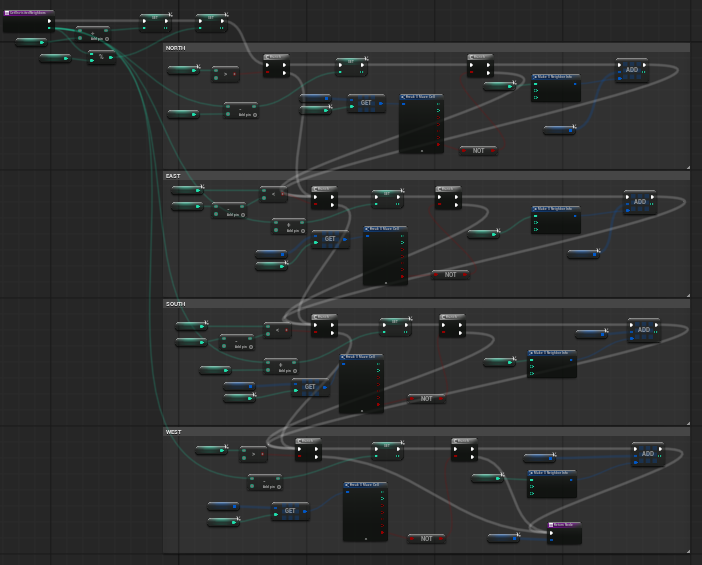
Connections recap
Execution flow:
GetUnvisitedNeighbors → Set CurrentRow → Set CurrentCol → North → East → South → West → Return Node
Within each direction:
Bounds Branch.True → Set TestIndex → Visited Branch.True → Add to LocalNeighbors
Data flow:
CurrentIndex / MazeWidth→CurrentRowCurrentIndex % MazeWidth→CurrentCol- Direction index formula →
TestIndex MazeGrid[TestIndex]→Break S_MazeCellNOT bVisited→ visited Branch conditionTestIndex+ direction deltas →Make S_NeighborInfoMake S_NeighborInfo→LocalNeighbors.AddLocalNeighbors→ Return NodeNeighborsoutput
Why this matters
This function is how the maze generator finds possible next moves.
It prevents the algorithm from:
- going outside the maze
- revisiting already visited cells
- choosing invalid directions
Without this function, the generator has no idea where it can go.
Common mistakes
❌ Forgetting the bounds check
✔️ Always check the neighbor is inside the maze before reading from MazeGrid
❌ Only connecting one wire into each direction’s Branch node
✔️ Both Branch.False and Add exec output must connect forward
❌ Reading the wrong cell
✔️ Always use TestIndex to read the neighbor, not CurrentIndex
❌ Forgetting to negate bVisited
✔️ You want NOT bVisited — unvisited neighbors only
❌ Adding a second Return Node
✔️ The Return Node already exists — scroll right to find it
Expected result
Your GetUnvisitedNeighbors function now:
- correctly calculates the position of each neighbor
- checks all four directions
- filters out out-of-bounds and already visited cells
- returns a clean array of valid next moves
Step 4 — Create the RemoveWallBetween Function
Now we need a helper function that removes the wall between two connected cells.
What this step does
Given:
- the current cell
- the chosen neighbor
- the direction between them
this function removes the correct wall from both cells.
This is what carves the path through the maze.
How this function works
When the maze algorithm moves from one cell to a neighbor, a wall exists between them on both sides. Both cells must agree the wall is gone:
| Direction | Current Cell loses | Neighbor Cell loses |
|---|---|---|
| North (DeltaY = -1) | bWallNorth | bWallSouth |
| East (DeltaX = 1) | bWallEast | bWallWest |
| South (DeltaY = 1) | bWallSouth | bWallNorth |
| West (DeltaX = -1) | bWallWest | bWallEast |
Because
MazeGridstores structs by value, any changes must be written back into the array explicitly. This function handles that.
Instructions
Step 4.1 — Create the function
Step 4.1.1 — Add the function
-
In the My Blueprint panel, find Functions
-
Click the + button next to Functions
-
Name the function:
RemoveWallBetween -
Press Enter
Step 4.2 — Add inputs
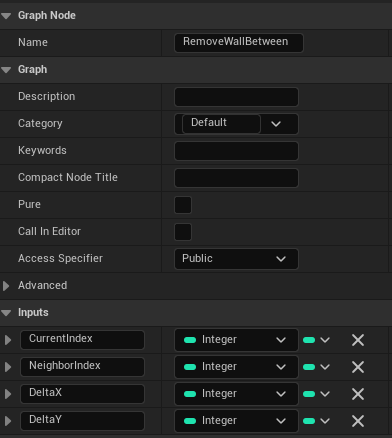
Step 4.2.1 — Add function inputs
-
In the Details panel for the function, find Inputs
-
Click the + button and add the following one at a time:
CurrentIndex(Integer)NeighborIndex(Integer)DeltaX(Integer)DeltaY(Integer)
Step 4.3 — Add local variables
Local variables only exist inside this function. They are added differently from regular Blueprint variables.
Step 4.3.1 — Find the Local Variables section
-
Look in the My Blueprint panel
-
Find the section labeled:
Local Variables
This section only appears when you are inside a function graph. If you do not see it, make sure you have the
RemoveWallBetweengraph open.
Step 4.3.2 — Add the local variables
-
Click the + button next to Local Variables
-
Add the following one at a time:
CurrentCell(S_MazeCell)NeighborCell(S_MazeCell)

Step 4.4 — Read the current cell from MazeGrid
Step 4.4.1 — Get the cell at CurrentIndex
-
From the function entry node, drag from the input pin:
CurrentIndex -
Search for:
Get (a copy) -
Click:
Get (a copy) -
Drag
MazeGridinto the graph as Get -
Connect:
MazeGrid→ Target Array onGet (a copy)
Step 4.4.2 — Store the result in CurrentCell
-
Drag
CurrentCellinto the graph as Set - Connect:
- output of
Get (a copy)→ value input onSet CurrentCell
- output of
-
Connect the white execution pin from:
RemoveWallBetween(function entry node)to
Set CurrentCell
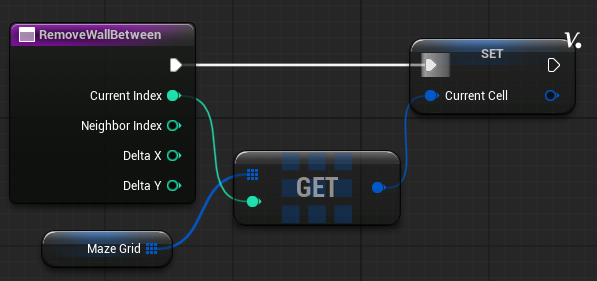
Connections recap
Execution flow:
RemoveWallBetween → Set CurrentCell
Data flow:
CurrentIndex→Get (a copy).IndexMazeGrid→Get (a copy).Target ArrayGet (a copy)output →Set CurrentCell
Step 4.5 — Read the neighbor cell from MazeGrid
Step 4.5.1 — Get the cell at NeighborIndex
-
From the function entry node, drag from the input pin:
NeighborIndex -
Search for:
Get (a copy) -
Click:
Get (a copy) -
Drag
MazeGridinto the graph as Get (it’s fine to use theMazeGridform the last step) -
Connect:
MazeGrid→ Target Array onGet (a copy)
Step 4.5.2 — Store the result in NeighborCell
-
Drag
NeighborCellinto the graph as Set - Connect:
- output of
Get (a copy)→ value input onSet NeighborCell
- output of
-
Connect the white execution pin from:
Set CurrentCellto
Set NeighborCell
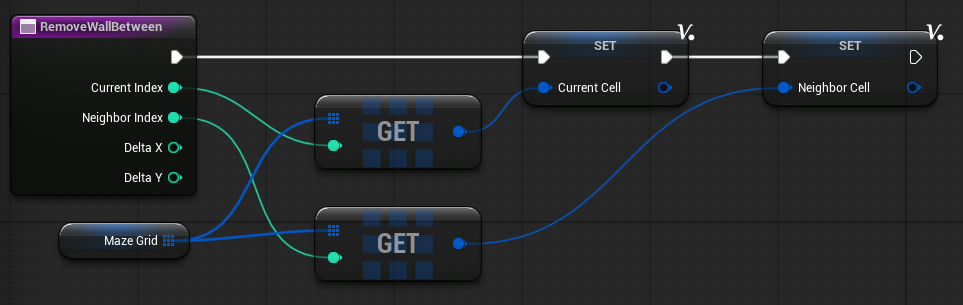
Connections recap
Execution flow:
Set CurrentCell → Set NeighborCell
Data flow:
NeighborIndex→Get (a copy).IndexMazeGrid→Get (a copy).Target ArrayGet (a copy)output →Set NeighborCell
Step 4.6 — Add the Sequence node
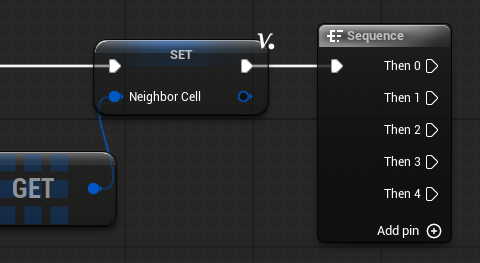
The Sequence node lets each direction check run independently from its own output pin, rather than chaining them together.
Step 4.6.1 — Add and connect Sequence
-
Right-click in empty graph space
-
Search for:
Sequence -
Click:
Sequence -
Connect the white execution pin from:
Set NeighborCellto
Sequence
The Sequence node starts with two outputs: Then 0 and Then 1.
You need five outputs total. Add three more:
- Click Add pin + on the Sequence node three times
You should now have:
Then 0→ North checkThen 1→ East checkThen 2→ South checkThen 3→ West checkThen 4→ Write-back to MazeGrid
Why this matters
Using a Sequence node means:
- each direction gets its own clean execution path
- no direction needs to chain into the next
- the write-back in
Then 4always runs after all direction checks are complete
This is much easier to manage than forcing all direction checks into one long branch chain.
Step 4.7 — Add comment boxes
Before placing any direction nodes, set up comment boxes to keep the graph organized.
Step 4.7.1 — Add the direction comment boxes
-
Left-click and drag in empty graph space to select an area
-
Press C
-
A comment box will appear
-
Name it:
North (DeltaY = -1) -
Repeat this process four more times, placing each box to the right of or below the previous one
-
Name them:
East (DeltaX = 1)South (DeltaY = 1)West (DeltaX = -1)Write-back to MazeGrid
The delta values in the label make it easy to verify at a glance that each direction block uses the correct comparison value.
Step 4.8 — Check direction: North
This check runs from Sequence → Then 0.
If DeltaY == -1:
- the current cell loses its North wall
- the neighbor cell loses its South wall
Place all nodes for this section inside the North (DeltaY = -1) comment box.
Step 4.8.1 — Check if the direction is North
-
From the function entry node, drag from the input pin:
DeltaY -
Search for:
== -
Choose:
Equal (==) -
Set the second input to:
-1 -
Right-click in empty graph space
-
Search for:
Branch -
Click:
Branch -
Connect the white execution pin from:
Sequence → Then 0to
Branch(inside the North comment box) -
Connect:
DeltaY == -1→Branch.Condition
Step 4.8.2 — Remove the North wall from CurrentCell
-
Right-click in empty graph space
-
Search for:
Set Members in S_MazeCell -
Click:
Set Members in S_MazeCell -
Drag
CurrentCellinto the graph as Get - Connect:
CurrentCell→ struct input (left side ofSet Members in S_MazeCell)
-
Click on
Set Members in S_MazeCell. In the Details panel, enable only:✔️
bWallNorthLeave all other checkboxes unchecked. Enabled fields are the only ones this node will modify.
- Set:
bWallNorth = False(unchecked)
-
Connect the white execution pin from:
Branch.True(North bounds check)to
Set Members in S_MazeCell(CurrentCell North) -
Drag
CurrentCellinto the graph as Set - Connect:
- output struct pin of
Set Members in S_MazeCell→ value input onSet CurrentCell
- output struct pin of
This writes the modified struct back into the local variable. Without this connection the change is lost.
Step 4.8.3 — Remove the South wall from NeighborCell
-
Right-click in empty graph space
-
Search for:
Set Members in S_MazeCell -
Click:
Set Members in S_MazeCell -
Drag
NeighborCellinto the graph as Get - Connect:
NeighborCell→ struct input (left side ofSet Members in S_MazeCell)
-
In the Details panel, enable only:
✔️
bWallSouth - Set:
bWallSouth = False(unchecked)
-
Connect the white execution pin from:
Set CurrentCell(inside the North comment box)to
Set Members in S_MazeCell(NeighborCell South) -
Drag
NeighborCellinto the graph as Set - Connect:
- output struct pin of
Set Members in S_MazeCell→ value input onSet NeighborCell
- output struct pin of
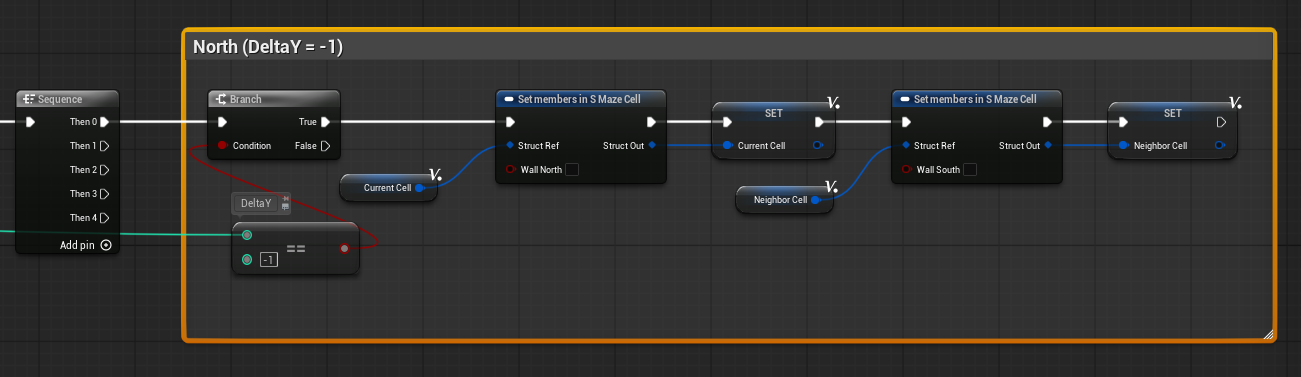
Connections recap
Execution flow:
Sequence → Then 0 → Branch → Set Members (CurrentCell North) → Set CurrentCell → Set Members (NeighborCell South) → Set NeighborCell
Data flow:
DeltaY == -1→Branch.ConditionCurrentCell→Set Members→Set CurrentCellNeighborCell→Set Members→Set NeighborCell
Step 4.9 — Check direction: East
This check runs from Sequence → Then 1.
If DeltaX == 1:
- the current cell loses its East wall
- the neighbor cell loses its West wall
Place all nodes for this section inside the East (DeltaX = 1) comment box.
Step 4.9.1 — Check if the direction is East
-
From the function entry node, drag from the input pin:
DeltaX -
Search for:
== -
Choose:
Equal (==) -
Set the second input to:
1 -
Right-click in empty graph space
-
Search for:
Branch -
Click:
Branch -
Connect the white execution pin from:
Sequence → Then 1to
Branch(inside the East comment box) -
Connect:
DeltaX == 1→Branch.Condition
Step 4.9.2 — Remove the East wall from CurrentCell
-
Right-click in empty graph space
-
Search for:
Set Members in S_MazeCell -
Click:
Set Members in S_MazeCell -
Drag
CurrentCellinto the graph as Get - Connect:
CurrentCell→ struct input (left side ofSet Members in S_MazeCell)
-
In the Details panel, enable only:
✔️
bWallEast - Set:
bWallEast = False(unchecked)
-
Connect the white execution pin from:
Branch.True(East bounds check)to
Set Members in S_MazeCell(CurrentCell East) -
Drag
CurrentCellinto the graph as Set - Connect:
- output struct pin of
Set Members in S_MazeCell→ value input onSet CurrentCell
- output struct pin of
Step 4.9.3 — Remove the West wall from NeighborCell
-
Right-click in empty graph space
-
Search for:
Set Members in S_MazeCell -
Click:
Set Members in S_MazeCell -
Drag
NeighborCellinto the graph as Get - Connect:
NeighborCell→ struct input (left side ofSet Members in S_MazeCell)
-
In the Details panel, enable only:
✔️
bWallWest - Set:
bWallWest = False(unchecked)
-
Connect the white execution pin from:
Set CurrentCell(inside the East comment box)to
Set Members in S_MazeCell(NeighborCell West) -
Drag
NeighborCellinto the graph as Set - Connect:
- output struct pin of
Set Members in S_MazeCell→ value input onSet NeighborCell
- output struct pin of

Connections recap
Execution flow:
Sequence → Then 1 → Branch → Set Members (CurrentCell East) → Set CurrentCell → Set Members (NeighborCell West) → Set NeighborCell
Data flow:
DeltaX == 1→Branch.ConditionCurrentCell→Set Members→Set CurrentCellNeighborCell→Set Members→Set NeighborCell
Step 4.10 — Check direction: South
This check runs from Sequence → Then 2.
If DeltaY == 1:
- the current cell loses its South wall
- the neighbor cell loses its North wall
Place all nodes for this section inside the South (DeltaY = 1) comment box.
Step 4.10.1 — Check if the direction is South
-
From the function entry node, drag from the input pin:
DeltaY -
Search for:
== -
Choose:
Equal (==) -
Set the second input to:
1 -
Right-click in empty graph space
-
Search for:
Branch -
Click:
Branch -
Connect the white execution pin from:
Sequence → Then 2to
Branch(inside the South comment box) -
Connect:
DeltaY == 1→Branch.Condition
Step 4.10.2 — Remove the South wall from CurrentCell
-
Right-click in empty graph space
-
Search for:
Set Members in S_MazeCell -
Click:
Set Members in S_MazeCell -
Drag
CurrentCellinto the graph as Get - Connect:
CurrentCell→ struct input (left side ofSet Members in S_MazeCell)
-
In the Details panel, enable only:
✔️
bWallSouth - Set:
bWallSouth = False(unchecked)
-
Connect the white execution pin from:
Branch.True(South bounds check)to
Set Members in S_MazeCell(CurrentCell South) -
Drag
CurrentCellinto the graph as Set - Connect:
- output struct pin of
Set Members in S_MazeCell→ value input onSet CurrentCell
- output struct pin of
Step 4.10.3 — Remove the North wall from NeighborCell
-
Right-click in empty graph space
-
Search for:
Set Members in S_MazeCell -
Click:
Set Members in S_MazeCell -
Drag
NeighborCellinto the graph as Get - Connect:
NeighborCell→ struct input (left side ofSet Members in S_MazeCell)
-
In the Details panel, enable only:
✔️
bWallNorth - Set:
bWallNorth = False(unchecked)
-
Connect the white execution pin from:
Set CurrentCell(inside the South comment box)to
Set Members in S_MazeCell(NeighborCell North) -
Drag
NeighborCellinto the graph as Set - Connect:
- output struct pin of
Set Members in S_MazeCell→ value input onSet NeighborCell
- output struct pin of
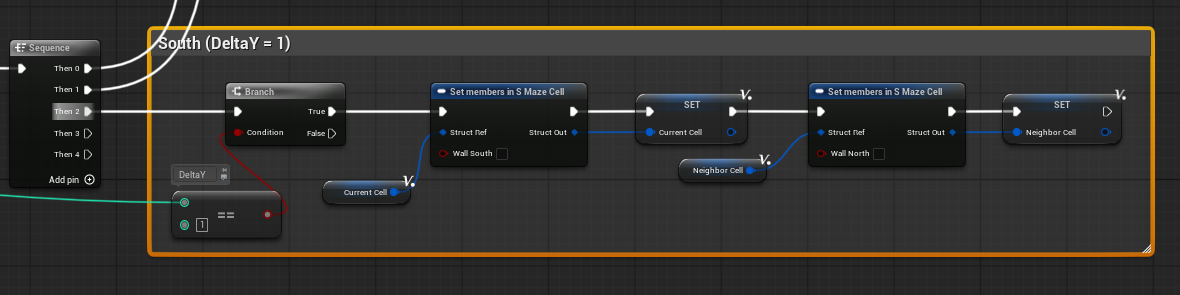
Connections recap
Execution flow:
Sequence → Then 2 → Branch → Set Members (CurrentCell South) → Set CurrentCell → Set Members (NeighborCell North) → Set NeighborCell
Data flow:
DeltaY == 1→Branch.ConditionCurrentCell→Set Members→Set CurrentCellNeighborCell→Set Members→Set NeighborCell
Step 4.11 — Check direction: West
This check runs from Sequence → Then 3.
If DeltaX == -1:
- the current cell loses its West wall
- the neighbor cell loses its East wall
Place all nodes for this section inside the West (DeltaX = -1) comment box.
Step 4.11.1 — Check if the direction is West
-
From the function entry node, drag from the input pin:
DeltaX -
Search for:
== -
Choose:
Equals (==) -
Set the second input to:
-1 -
Right-click in empty graph space
-
Search for:
Branch -
Click:
Branch -
Connect the white execution pin from:
Sequence → Then 3to
Branch(inside the West comment box) -
Connect:
DeltaX == -1→Branch.Condition
Step 4.11.2 — Remove the West wall from CurrentCell
-
Right-click in empty graph space
-
Search for:
Set Members in S_MazeCell -
Click:
Set Members in S_MazeCell -
Drag
CurrentCellinto the graph as Get - Connect:
CurrentCell→ struct input (left side ofSet Members in S_MazeCell)
-
In the Details panel, enable only:
✔️
bWallWest - Set:
bWallWest = False(unchecked)
-
Connect the white execution pin from:
Branch.True(West bounds check)to
Set Members in S_MazeCell(CurrentCell West) -
Drag
CurrentCellinto the graph as Set - Connect:
- output struct pin of
Set Members in S_MazeCell→ value input onSet CurrentCell
- output struct pin of
Step 4.11.3 — Remove the East wall from NeighborCell
-
Right-click in empty graph space
-
Search for:
Set Members in S_MazeCell -
Click:
Set Members in S_MazeCell -
Drag
NeighborCellinto the graph as Get - Connect:
NeighborCell→ struct input (left side ofSet Members in S_MazeCell)
-
In the Details panel, enable only:
✔️
bWallEast - Set:
bWallEast = False(unchecked)
-
Connect the white execution pin from:
Set CurrentCell(inside the West comment box)to
Set Members in S_MazeCell(NeighborCell East) -
Drag
NeighborCellinto the graph as Set - Connect:
- output struct pin of
Set Members in S_MazeCell→ value input onSet NeighborCell
- output struct pin of
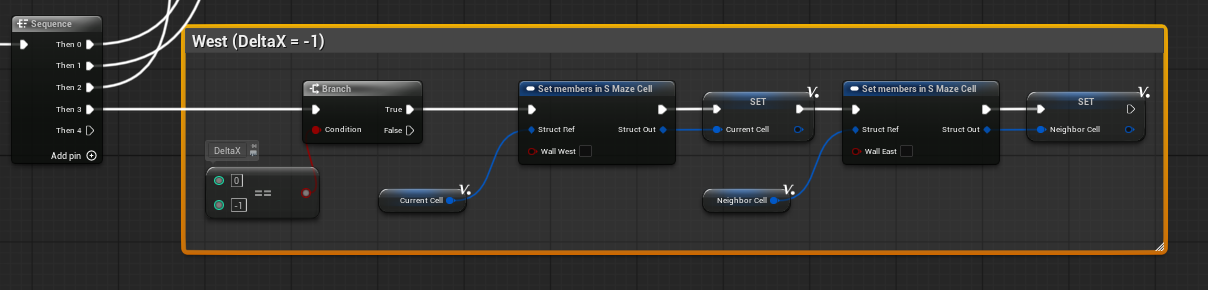
Connections recap
Execution flow:
Sequence → Then 3 → Branch → Set Members (CurrentCell West) → Set CurrentCell → Set Members (NeighborCell East) → Set NeighborCell
Data flow:
DeltaX == -1→Branch.ConditionCurrentCell→Set Members→Set CurrentCellNeighborCell→Set Members→Set NeighborCell
Step 4.12 — Write updated cells back into MazeGrid
This runs from Sequence → Then 4.
Place all nodes for this section inside the Write-back to MazeGrid comment box.
The local CurrentCell and NeighborCell variables now hold the correct wall states. This step writes them permanently back into MazeGrid.
Step 4.12.1 — Add Set Array Elem for CurrentCell
-
Right-click in empty graph space
-
Search for:
Set Array Elem -
Click:
Set Array Elem -
Drag
MazeGridinto the graph as Get - Connect:
MazeGrid→ Target Array onSet Array Elem
-
Drag
CurrentCellinto the graph as Get - Connect:
CurrentCell→ Item onSet Array Elem
-
From the function entry node, drag from the input pin:
CurrentIndex - Connect:
CurrentIndex→ Index onSet Array Elem
-
Connect the white execution pin from:
Sequence → Then 4to
Set Array Elem(CurrentCell) -
In the Details panel for
Set Array Elem, confirm:☐ Size to Fit is unchecked
Size to Fit would expand the array automatically if the index is out of range. Since
MazeGridis already fully populated, leave this unchecked to avoid unintended array growth.
Step 4.12.2 — Add Set Array Elem for NeighborCell
-
Right-click in empty graph space
-
Search for:
Set Array Elem -
Click:
Set Array Elem -
Drag
MazeGridinto the graph as Get - Connect:
MazeGrid→ Target Array onSet Array Elem
-
Drag
NeighborCellinto the graph as Get - Connect:
NeighborCell→ Item onSet Array Elem
-
From the function entry node, drag from the input pin:
NeighborIndex - Connect:
NeighborIndex→ Index onSet Array Elem
-
Connect the white execution pin from:
Set Array Elem(CurrentCell)to
Set Array Elem(NeighborCell) - Confirm Size to Fit is unchecked
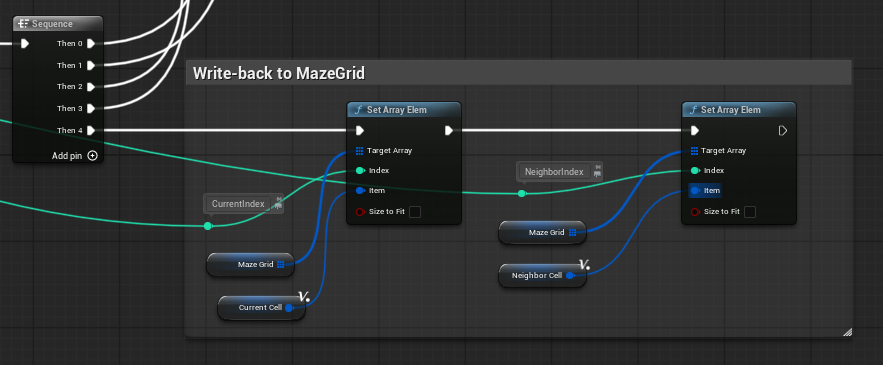
Connections recap
Execution flow:
Sequence → Then 4 → Set Array Elem (CurrentCell) → Set Array Elem (NeighborCell)
Data flow:
MazeGrid→ Target Array (both nodes)CurrentCell+CurrentIndex→Set Array Elem(CurrentCell)NeighborCell+NeighborIndex→Set Array Elem(NeighborCell)
Step 4.13 — Full function overview
Your RemoveWallBetween function is now complete.
The full execution flow is:
RemoveWallBetween
→ Set CurrentCell
→ Set NeighborCell
→ Sequence
   → Then 0: DeltaY == -1 → remove North/South walls
   → Then 1: DeltaX == 1  → remove East/West walls
   → Then 2: DeltaY == 1  → remove South/North walls
   → Then 3: DeltaX == -1 → remove West/East walls
   → Then 4: write CurrentCell and NeighborCell back into MazeGrid
Only one direction branch will fire per call — whichever matches the actual DeltaX / DeltaY values passed in. The write-back in Then 4 always runs regardless of which direction fired.
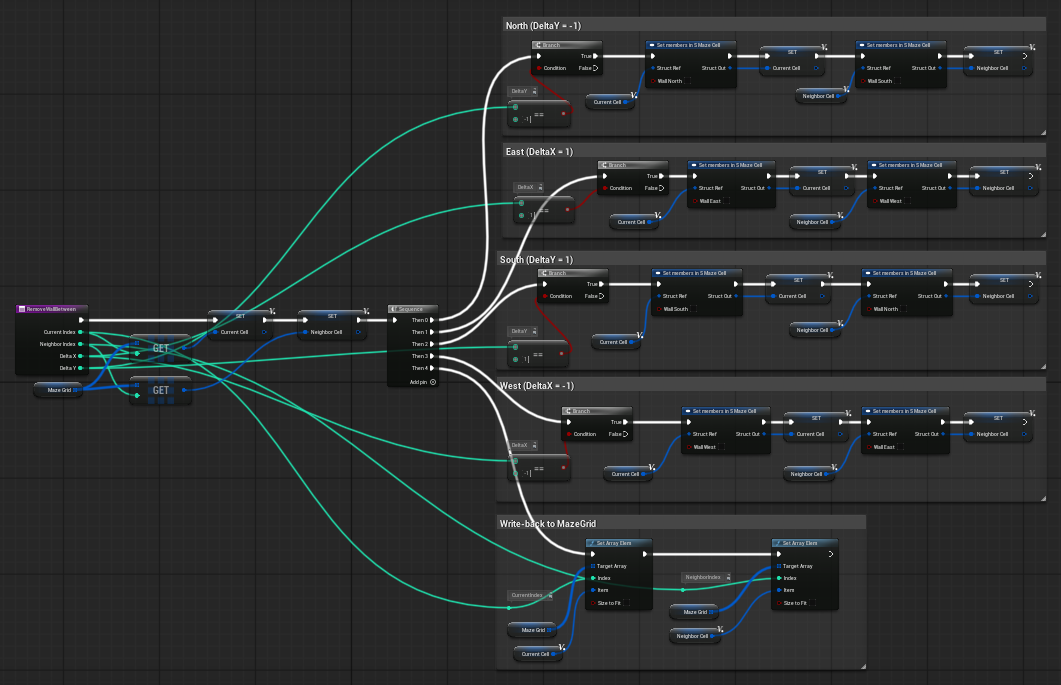
Why this matters
In Unreal Engine, array elements that are structs are always returned as copies. Any changes made to a local struct variable are not automatically saved back to the array. The write-back steps in Then 4 ensure that the wall changes are permanently stored in MazeGrid.
Without the write-back:
- the walls would appear to change locally
- but
MazeGridwould still show all walls intact - the maze would never actually be carved
Common mistakes
❌ Forgetting to connect the Set Members output back into Set CurrentCell or Set NeighborCell
✔️ The output struct pin must feed back into the local variable or the change is lost
❌ Not clicking Add pin + on the Sequence node
✔️ You need five outputs — Then 0 through Then 4
❌ Enabling multiple checkboxes in Set Members in S_MazeCell
✔️ Enable only the one wall being removed — other enabled fields will overwrite data unexpectedly
❌ Leaving Size to Fit checked on Set Array Elem
✔️ This can cause unintended array growth if an index is ever out of range
❌ Forgetting the write-back entirely
✔️ MazeGrid stores structs by value — local changes must be explicitly written back with Set Array Elem
Expected result
Your RemoveWallBetween function now:
- reads the current and neighbor cells from
MazeGrid - determines which walls to remove based on the direction
- updates both local cell variables correctly
- writes both cells back into
MazeGrid
When called by the maze algorithm, this function permanently carves a passage between any two adjacent cells.
Step 5 — Create the GenerateMaze Function
Now we build the main maze generation logic.
What this step does
This function:
- picks a random starting cell
- marks it visited
- uses a stack to track the current path
- chooses unvisited neighbors
- removes walls between cells
- backtracks when stuck
This creates the full maze in memory.
How this function works
This function uses a stack-based depth-first search. Unlike true recursion, a stack array never overflows — it is safe to use in Unreal Engine Blueprints regardless of maze size.
The algorithm works like this:
- Pick a random starting cell and mark it visited
- Push it onto the stack
- While the stack is not empty:
- Look at the top of the stack (the current cell)
- If it has unvisited neighbors → choose one randomly, remove the wall, mark it visited, push it onto the stack
- If it has no unvisited neighbors → remove it from the stack (backtrack)
Backtracking is what allows the algorithm to finish the maze instead of stopping at the first dead end.
Instructions
Step 5.1 — Create the function
Step 5.1.1 — Add the function
-
In the My Blueprint panel, find Functions
-
Click the + button next to Functions
-
Name the function:
GenerateMaze -
Press Enter
Step 5.2 — Add local variables
Local variables only exist inside this function.
Step 5.2.1 — Find the Local Variables section
-
Look in the My Blueprint panel
-
Find the section labeled:
Local Variables
This section only appears when you are inside a function graph. If you do not see it, make sure you have the
GenerateMazegraph open.
Step 5.2.2 — Add the local variables
-
Click the + button next to Local Variables
-
Add the following one at a time:
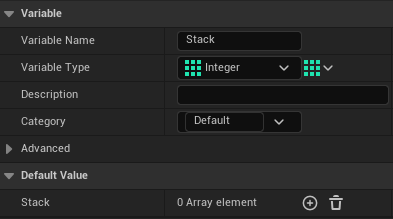
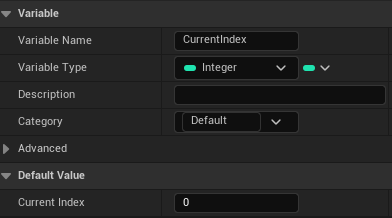
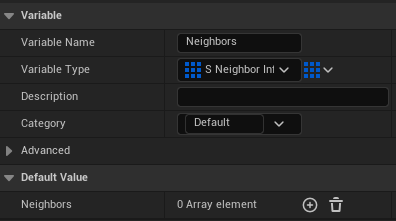
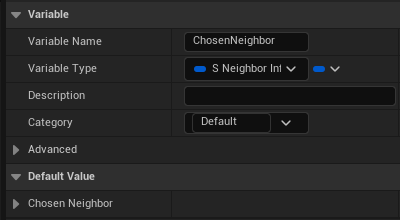
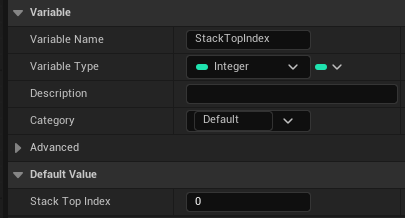
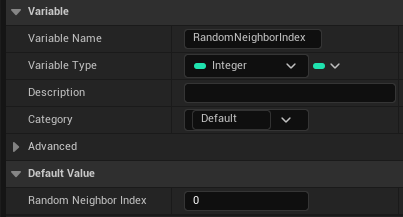
Stack(Array of Integer)CurrentIndex(Integer)Neighbors(Array ofS_NeighborInfo)ChosenNeighbor(S_NeighborInfo)StackTopIndex(Integer)RandomNeighborIndex(Integer)
Step 5.3 — Add comment boxes
Before placing any nodes, set up comment boxes to keep the graph organised.
Step 5.3.1 — Add the comment boxes
-
Left-click and drag in empty graph space to select an area
-
Press C
-
A comment box will appear
-
Name it:
Setup -
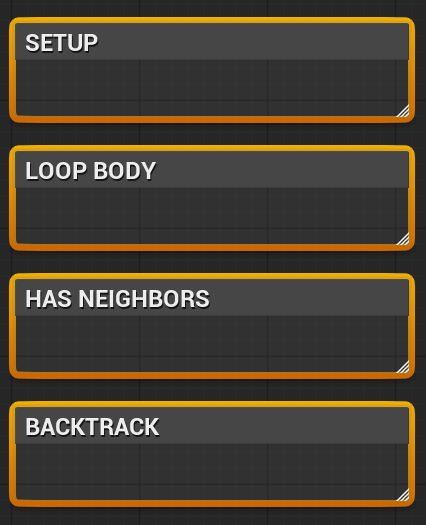
Repeat this process three more times
-
Name them:
Loop BodyHas NeighborsBacktrack
You can resize and reposition comment boxes at any time by dragging their edges or title bar.
Step 5.4 — Choose the starting cell
Place all nodes for this section inside the Setup comment box.
Step 5.4.1 — Calculate the max valid index
-
Drag
MazeWidthinto the graph as Get -
Drag from the
MazeWidthpin -
Search for:
* -
Choose:
Multiply -
Drag
MazeHeightinto the graph as Get - Connect:
MazeHeight→ second input of*
-
Drag from the multiply result
-
Search for:
- -
Choose:
Subtract -
Set the second input to:
1
Step 5.4.2 — Pick a random starting index
-
Drag
RandomStreaminto the graph as Get -
Drag from the subtract result
-
Search for:
Random Integer in Range from Stream -
Click:
Random Integer in Range from Stream - Connect:
- subtract result →
Max RandomStream→Stream
- subtract result →
- Set:
Min = 0
Step 5.4.3 — Store the starting index
-
Drag
CurrentIndexinto the graph as Set - Connect:
- random result → value input on
Set CurrentIndex
- random result → value input on
-
Connect the white execution pin from:
GenerateMaze(function entry node)to
Set CurrentIndex
Connections recap
Execution flow:
GenerateMaze → Set CurrentIndex
Data flow:
MazeWidth × MazeHeight - 1→MaxRandomStream→Stream- random result →
CurrentIndex
Step 5.5 — Mark the starting cell as visited
Still inside the Setup comment box.
Step 5.5.1 — Read the starting cell from MazeGrid
-
Drag
CurrentIndexinto the graph as Get -
Drag from the
CurrentIndexpin -
Search for:
Get (a copy) -
Click:
Get (a copy) -
Drag
MazeGridinto the graph as Get -
Connect:
MazeGrid→ Target Array onGet (a copy)
Step 5.5.2 — Set bVisited to True
-
Drag from the output of
Get (a copy) -
Search for:
Set Members in S_MazeCell -
Click:
Set Members in S_MazeCell -
In the Details panel, enable only:
✔️
bVisited -
Set:
bVisited = True(checked)
Step 5.5.3 — Write the updated cell back into MazeGrid
-
Right-click in empty graph space
-
Search for:
Set Array Elem -
Click:
Set Array Elem -
Drag
MazeGridinto the graph as Get - Connect:
MazeGrid→ Target Array onSet Array Elem- output of
Set Members in S_MazeCell→ Item onSet Array Elem CurrentIndex→ Index onSet Array Elem
-
Confirm Size to Fit is unchecked
-
Connect the white execution pin from:
Set CurrentIndexto
Set Members in S_MazeCell -
Connect the white execution pin from:
Set Members in S_MazeCellto
Set Array Elem
Connections recap
Execution flow:
Set CurrentIndex → Set Members in S_MazeCell → Set Array Elem
Data flow:
CurrentIndex→Get (a copy).IndexMazeGrid→Get (a copy).Target ArrayGet (a copy)output →Set Members in S_MazeCellSet Membersoutput →Set Array Elem.ItemCurrentIndex→Set Array Elem.IndexMazeGrid→Set Array Elem.Target Array
Step 5.6 — Add the starting cell to the Stack
Still inside the Setup comment box.
Step 5.6.1 — Push the starting index onto the Stack
-
Drag
Stackinto the graph as Get -
Drag from the
Stackpin -
Search for:
Add -
Click:
Add -
Drag
CurrentIndexinto the graph as Get - Connect:
CurrentIndex→ Item onAdd
-
Connect the white execution pin from:
Set Array Elemto
Add
Connections recap
Execution flow:
Set Array Elem → Stack.Add
Data flow:
CurrentIndex→Stack.Add.Item
Why this matters
The stack is what allows the algorithm to move forward and backtrack correctly. Without the starting cell on the stack, the While Loop has nothing to work with and will never run.
Step 5.7 — Add the While Loop
The While Loop is the heart of the maze algorithm. It runs once per cell visit or backtrack until the entire maze has been carved.
Place the While Loop between the Setup comment box and the Loop Body comment box so it is clearly visible as the entry point to the loop.
Step 5.7.1 — Add the While Loop node
-
Right-click in empty graph space
-
Search for:
While Loop -
Click:
While Loop -
Connect the white execution pin from:
Stack.Addto
While Loop
Step 5.7.2 — Set the loop condition
-
Drag
Stackinto the graph as Get -
Drag from the
Stackpin -
Search for:
Length -
Click:
Array Length -
Drag from the
Lengthresult -
Search for:
> -
Choose:
Greater -
Set the second input to:
0 -
Connect:
Stack.Length > 0→While Loop.Condition

Connections recap
Execution flow:
Stack.Add → While Loop
Data flow:
Stack.Length > 0→While Loop.Condition
Why this matters
The loop continues as long as there are cells on the stack. When the stack empties, every reachable cell has been visited and the maze is complete.
Common mistakes
❌ Using >= 0 instead of > 0
✔️ A length of 0 means the stack is empty — the loop must stop
❌ Leaving the condition disconnected ✔️ The While Loop must know when to stop or it will run forever
Warning: If the editor freezes when you first test this function, the most likely cause is that
bVisitedis not being written back toMazeGridcorrectly. Go back and verify Steps 5.5 and 5.12.
Step 5.8 — Find the top of the Stack
Place all nodes for this section inside the Loop Body comment box.
Each time the loop runs, we need to know which cell we are currently working on. The top of the stack is always the current cell.
Step 5.8.1 — Calculate StackTopIndex
-
Drag
Stackinto the graph as Get -
Drag from the
Stackpin -
Search for:
Length -
Click:
Array Length -
Drag from the
Lengthresult -
Search for:
- -
Choose:
Subtract -
Set the second input to:
1 -
Drag
StackTopIndexinto the graph as Set - Connect:
- subtraction result → value input on
Set StackTopIndex
- subtraction result → value input on
-
Connect the white execution pin from:
While Loop.Loop Bodyto
Set StackTopIndex
Step 5.8.2 — Read the current cell index from the Stack
-
Drag
Stackinto the graph as Get -
Drag from the
Stackpin -
Search for:
Get (a copy) -
Click:
Get (a copy) -
Drag
StackTopIndexinto the graph as Get - Connect:
StackTopIndex→ Index onGet (a copy)
-
Drag
CurrentIndexinto the graph as Set - Connect:
- result of
Get (a copy)→ value input onSet CurrentIndex
- result of
-
Connect the white execution pin from:
Set StackTopIndexto
Set CurrentIndex
This does not remove the entry from the stack — it only reads it. The stack entry is only removed during backtracking in Step 5.14. This is intentional: the current cell stays on the stack until it becomes a dead end.
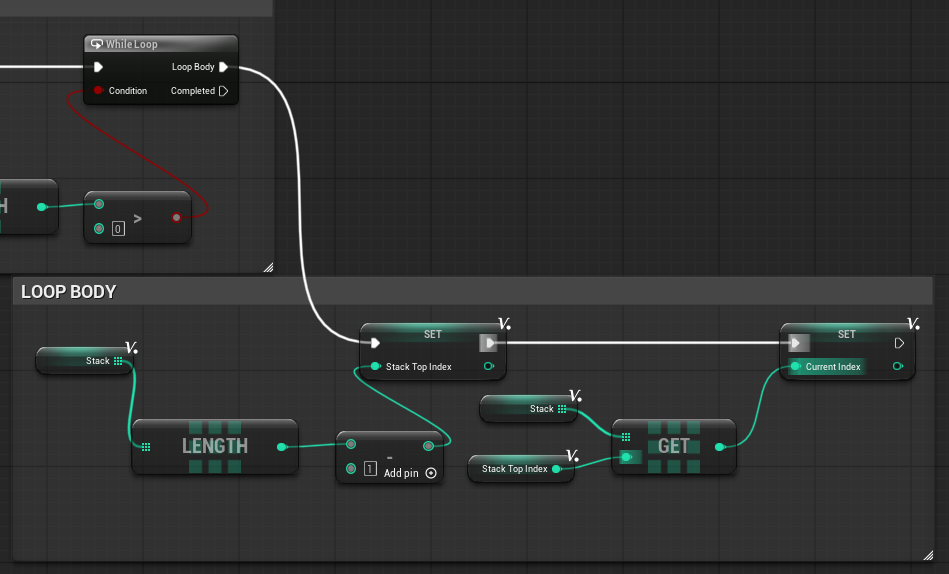
Connections recap
Execution flow:
While Loop.Loop Body → Set StackTopIndex → Set CurrentIndex
Data flow:
Stack.Length - 1→StackTopIndexStack[StackTopIndex]→CurrentIndex
Common mistakes
❌ Using index 0 instead of StackTopIndex
✔️ The top of the stack is always the last entry, not the first
Step 5.9 — Get unvisited neighbors for the current cell
Still inside the Loop Body comment box.
Step 5.9.1 — Call GetUnvisitedNeighbors
-
Right-click in empty graph space
-
Search for:
GetUnvisitedNeighbors -
Click:
GetUnvisitedNeighbors -
Drag
CurrentIndexinto the graph as Get - Connect:
CurrentIndex→CurrentIndexinput onGetUnvisitedNeighbors
-
Connect the white execution pin from:
Set CurrentIndexto
GetUnvisitedNeighbors
Step 5.9.2 — Store the result
-
Drag
Neighborsinto the graph as Set - Connect:
- return value of
GetUnvisitedNeighbors→ value input onSet Neighbors
- return value of
-
Connect the white execution pin from:
GetUnvisitedNeighborsto
Set Neighbors
Connections recap
Execution flow:
Set CurrentIndex → GetUnvisitedNeighbors → Set Neighbors
Data flow:
CurrentIndex→GetUnvisitedNeighbors.CurrentIndex- returned array →
Neighbors
Step 5.10 — Check whether any neighbors exist
Still inside the Loop Body comment box.
This is the main decision point of the algorithm:
- True → move forward into a neighbor
- False → backtrack by removing the top stack entry
Step 5.10.1 — Check the neighbor count
-
Drag
Neighborsinto the graph as Get -
Drag from the
Neighborspin -
Search for:
Length -
Click:
Array Length -
Drag from the
Lengthresult -
Search for:
> -
Choose:
Greater -
Set the second input to:
0
Step 5.10.2 — Add the Branch node
-
Right-click in empty graph space
-
Search for:
Branch -
Click:
Branch -
Connect the white execution pin from:
Set Neighborsto
Branch -
Connect:
Neighbors.Length > 0→Branch.Condition

Connections recap
Execution flow:
Set Neighbors → Branch
Data flow:
Neighbors.Length > 0→Branch.Condition
Why this matters
This is the main decision point in the algorithm.
- True = at least one unvisited neighbor exists → move forward
- False = no unvisited neighbors → backtrack
Step 5.11 — If neighbors exist, choose one randomly
Place all nodes for this section inside the Has Neighbors comment box.
Step 5.11.1 — Calculate the max neighbor index
-
Drag
Neighborsinto the graph as Get -
Drag from the
Neighborspin -
Search for:
Length -
Click:
Array Length -
Drag from the
Lengthresult -
Search for:
- -
Choose:
Subtract -
Set the second input to:
1
Step 5.11.2 — Pick a random neighbor index
-
Drag
RandomStreaminto the graph as Get -
Drag from the subtract result
-
Search for:
Random Integer in Range from Stream -
Click:
Random Integer in Range from Stream - Connect:
- subtract result →
Max RandomStream→Stream
- subtract result →
- Set:
Min = 0
-
Drag
RandomNeighborIndexinto the graph as Set - Connect:
- random result → value input on
Set RandomNeighborIndex
- random result → value input on
-
Connect the white execution pin from:
Branch.True(at the end of the loop body comment box)to
Set RandomNeighborIndex
Step 5.11.3 — Read the chosen neighbor
-
Drag
Neighborsinto the graph as Get -
Drag from the
Neighborspin -
Search for:
Get (a copy) -
Click:
Get (a copy) -
Drag
RandomNeighborIndexinto the graph as Get - Connect:
RandomNeighborIndex→ Index onGet (a copy)
-
Drag
ChosenNeighborinto the graph as Set - Connect:
- result of
Get (a copy)→ value input onSet ChosenNeighbor
- result of
-
Connect the white execution pin from:
Set RandomNeighborIndexto
Set ChosenNeighbor
Connections recap
Execution flow:
Branch.True → Set RandomNeighborIndex → Set ChosenNeighbor
Data flow:
Neighbors.Length - 1→MaxRandomStream→Stream- random result →
RandomNeighborIndex Neighbors[RandomNeighborIndex]→ChosenNeighbor
Common mistakes
❌ Using Neighbors.Length as the Max value
✔️ Use Neighbors.Length - 1 — arrays are zero-based
Step 5.12 — Remove the wall between the current cell and the chosen neighbor
Still inside the Has Neighbors comment box.
Step 5.12.1 — Break the ChosenNeighbor struct
Before calling RemoveWallBetween, you need to extract the values stored inside ChosenNeighbor. You will reuse this Break node’s outputs in Steps 5.12, 5.13, and 5.14, so place it in a clear position.
-
Drag
ChosenNeighborinto the graph as Get -
Drag from the
ChosenNeighborpin -
Search for:
Break S_NeighborInfo -
Click:
Break S_NeighborInfo
This gives you three output pins:
CellIndex— the array index of the neighbor cellDeltaX— the horizontal directionDeltaY— the vertical direction
You will use all three of these outputs across the next three steps. Do not create additional Break nodes — reuse the output pins from this one.
Step 5.12.2 — Call RemoveWallBetween
-
Right-click in empty graph space
-
Search for:
RemoveWallBetween -
Click:
RemoveWallBetween -
Drag
CurrentIndexinto the graph as Get - Connect:
CurrentIndex→CurrentIndexonRemoveWallBetweenCellIndex(fromBreak S_NeighborInfo) →NeighborIndexonRemoveWallBetweenDeltaX(fromBreak S_NeighborInfo) →DeltaXonRemoveWallBetweenDeltaY(fromBreak S_NeighborInfo) →DeltaYonRemoveWallBetween
-
Connect the white execution pin from:
Set ChosenNeighborto
RemoveWallBetween
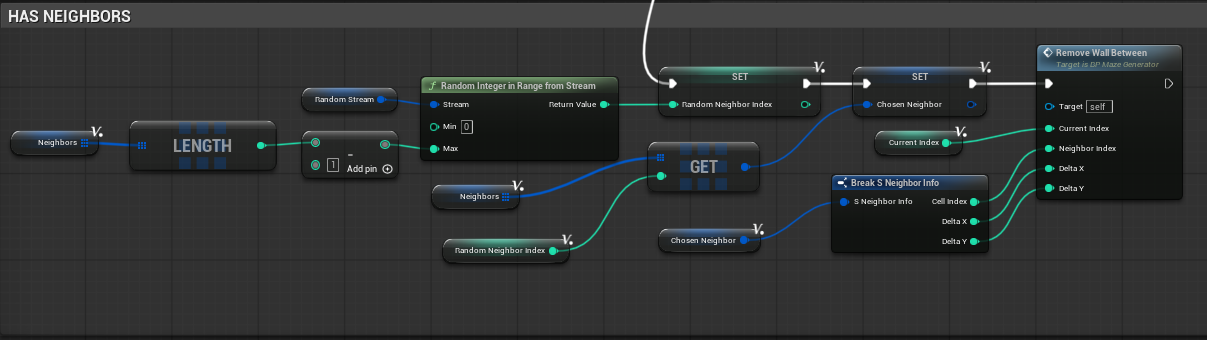
Connections recap
Execution flow:
Set ChosenNeighbor → RemoveWallBetween
Data flow:
CurrentIndex→RemoveWallBetween.CurrentIndexBreak S_NeighborInfo.CellIndex→RemoveWallBetween.NeighborIndexBreak S_NeighborInfo.DeltaX→RemoveWallBetween.DeltaXBreak S_NeighborInfo.DeltaY→RemoveWallBetween.DeltaY
Step 5.13 — Mark the chosen neighbor as visited
Still inside the Has Neighbors comment box.
Step 5.13.1 — Read the neighbor cell from MazeGrid
-
Drag
MazeGridinto the graph as Get -
Drag from the
MazeGridpin -
Search for:
Get (a copy) -
Click:
Get (a copy) -
Connect:
CellIndex(fromBreak S_NeighborInfoin Step 5.12.1) → Index onGet (a copy)
Step 5.13.2 — Set bVisited to True
-
Drag from the output of
Get (a copy) -
Search for:
Set Members in S_MazeCell -
Click:
Set Members in S_MazeCell -
In the Details panel, enable only:
✔️
bVisited -
Set:
bVisited = True(checked)
Step 5.13.3 — Write the updated cell back into MazeGrid
-
Right-click in empty graph space
-
Search for:
Set Array Elem -
Click:
Set Array Elem -
Drag
MazeGridinto the graph as Get - Connect:
MazeGrid→ Target Array onSet Array Elem- output of
Set Members in S_MazeCell→ Item onSet Array Elem CellIndex(fromBreak S_NeighborInfoin Step 5.12.1) → Index onSet Array Elem
-
Confirm Size to Fit is unchecked
-
Connect the white execution pin from:
RemoveWallBetweento
Set Members in S_MazeCell -
Connect the white execution pin from:
Set Members in S_MazeCellto
Set Array Elem
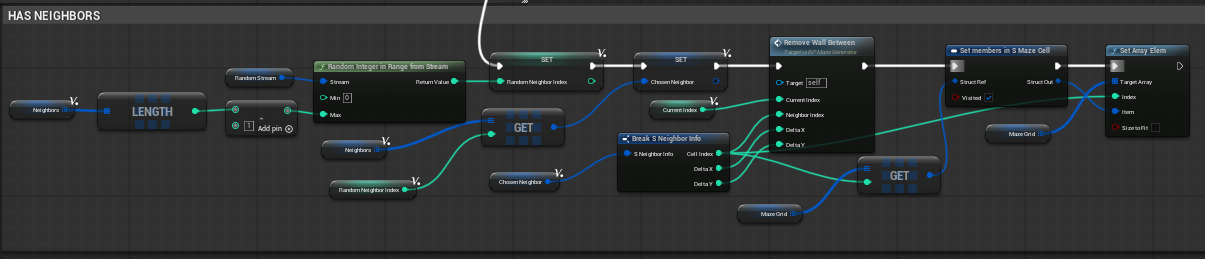
Connections recap
Execution flow:
RemoveWallBetween → Set Members in S_MazeCell → Set Array Elem
Data flow:
CellIndex(reused from Break in Step 5.12.1) →Get (a copy).IndexMazeGrid→Get (a copy).Target ArrayGet (a copy)output →Set Members in S_MazeCellSet Membersoutput →Set Array Elem.ItemCellIndex(reused from Break in Step 5.12.1) →Set Array Elem.IndexMazeGrid→Set Array Elem.Target Array
Why this matters
Once the algorithm enters a cell, that cell must be marked visited immediately. If it is not, GetUnvisitedNeighbors will return it as a valid option again and the maze logic will break.
Step 5.14 — Push the chosen neighbor onto the Stack
Still inside the Has Neighbors comment box.
Step 5.14.1 — Add the neighbor to the Stack
-
Drag
Stackinto the graph as Get -
Drag from the
Stackpin -
Search for:
Add -
Click:
Add - Connect:
CellIndex(reused fromBreak S_NeighborInfoin Step 5.12.1) → Item onAdd
-
Connect the white execution pin from:
Set Array Elemto
Add

Connections recap
Execution flow:
Set Array Elem → Stack.Add
Data flow:
CellIndex(reused from Break in Step 5.12.1) →Stack.Add.Item
Why this matters
Pushing the chosen neighbor onto the stack is what drives the depth-first search forward. On the next loop pass, this cell becomes the new current cell.
Step 5.15 — If no neighbors exist, backtrack
Place all nodes for this section inside the Backtrack comment box.
When the current cell has no unvisited neighbors it is a dead end. The algorithm backtracks by removing the current cell from the top of the stack. On the next loop pass, the previous cell becomes current again.
Step 5.15.1 — Remove the top stack entry
-
Drag
Stackinto the graph as Get -
Drag from the
Stackpin -
Search for:
Remove Index -
Click:
Remove Index -
Drag
StackTopIndexinto the graph as Get - Connect:
StackTopIndex→ Index onRemove Index
-
Connect the white execution pin from:
Branch.Falseto
Remove Index
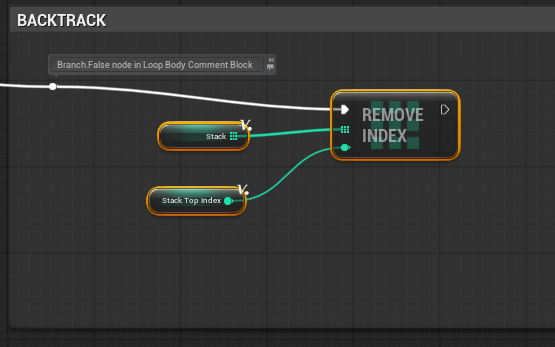
Connections recap
Execution flow:
Branch.False → Stack.Remove Index
Data flow:
StackTopIndex→Remove Index.Index
Why this matters
Removing the top stack entry forces the algorithm to return to the previous cell and try a different direction. This is what allows the maze to be fully explored rather than stopping at the first dead end.
Common mistakes
❌ Removing index 0 instead of StackTopIndex
✔️ Always remove the top entry — the last item in the array
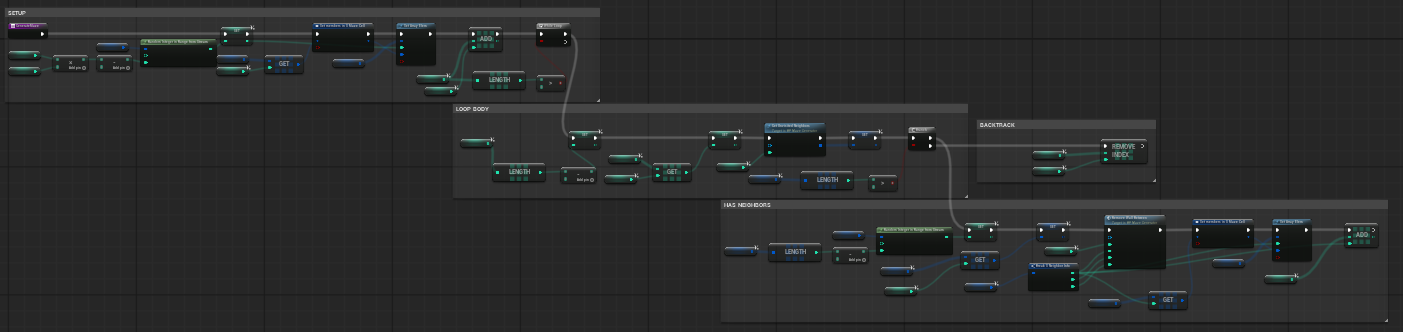
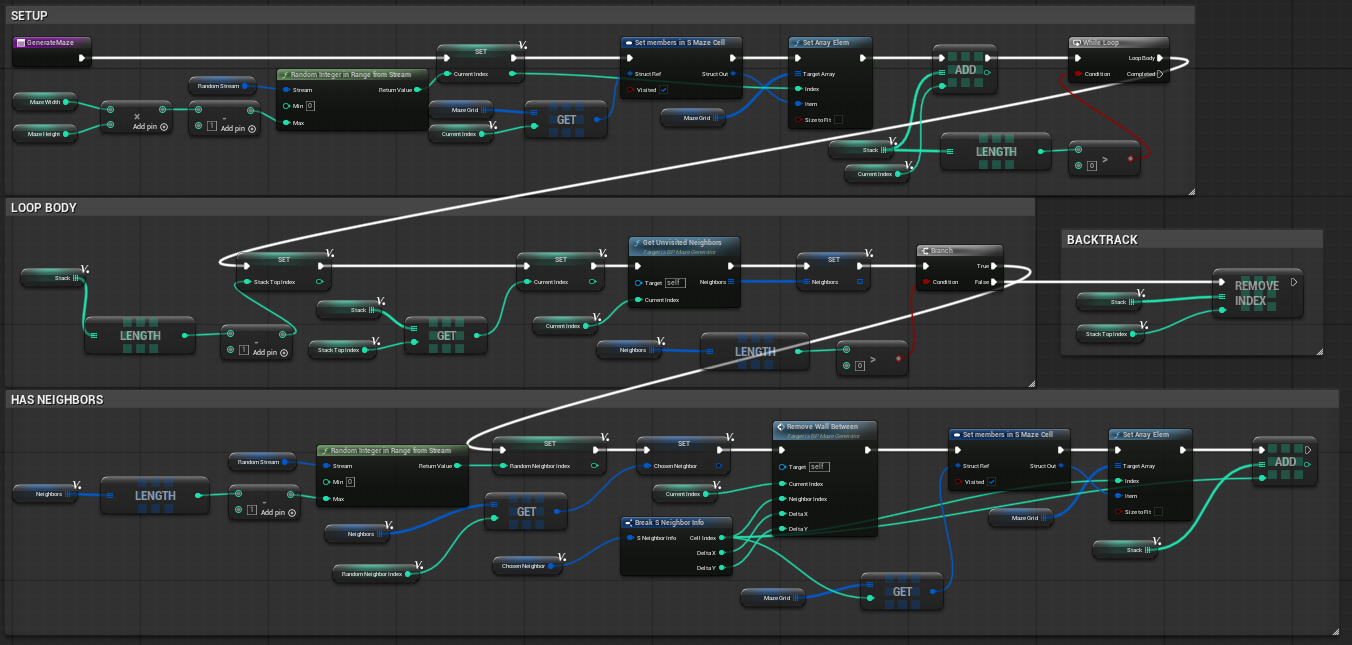
Step 5.16 — Full function overview
Your GenerateMaze function is now complete.
The full execution flow is:
GenerateMaze
→ Set CurrentIndex (random start)
→ Mark start cell visited → Write back to MazeGrid
→ Push start onto Stack
→ While Loop (Stack.Length > 0)
   Loop Body:
   → Set StackTopIndex
   → Set CurrentIndex from Stack top
   → GetUnvisitedNeighbors
   → Set Neighbors
   → Branch (Neighbors.Length > 0)
      True → Has Neighbors:
         → Set RandomNeighborIndex
         → Set ChosenNeighbor
         → Break S_NeighborInfo (reused through Steps 5.12–5.14)
         → RemoveWallBetween
         → Mark ChosenNeighbor visited → Write back to MazeGrid
         → Push ChosenNeighbor.CellIndex onto Stack
      False → Backtrack:
         → Stack.Remove Index at StackTopIndex
Final Connections recap
Execution flow:
GenerateMaze → Set CurrentIndex → Set Members → Set Array Elem → Stack.Add → While Loop
Loop Body:
While Loop.Loop Body → Set StackTopIndex → Set CurrentIndex → GetUnvisitedNeighbors → Set Neighbors → Branch
Has Neighbors path:
Branch.True → Set RandomNeighborIndex → Set ChosenNeighbor → RemoveWallBetween → Set Members → Set Array Elem → Stack.Add
Backtrack path:
Branch.False → Stack.Remove Index
Data flow:
MazeWidth × MazeHeight - 1→ start cell Max indexRandomStream→ start cell random selection- random result →
CurrentIndex CurrentIndex→MazeGridlookup for start cell- updated start cell →
Set Array Elem CurrentIndex→Stack.AddStack.Length - 1→StackTopIndexStack[StackTopIndex]→CurrentIndexCurrentIndex→GetUnvisitedNeighbors- returned array →
Neighbors Neighbors.Length - 1→ random neighbor Max indexRandomStream→ random neighbor selection- random result →
RandomNeighborIndex Neighbors[RandomNeighborIndex]→ChosenNeighborBreak S_NeighborInfooutputs →RemoveWallBetweeninputsCellIndex→ visited update andStack.AddStackTopIndex→Stack.Remove Index
Why this matters
This function is the entire brain of the maze generator. Everything built in Parts 1 and 2 exists to support what happens here.
When this function finishes, every cell in
MazeGridhas been visited and the correct walls have been removed to form a perfect maze with no loops and no isolated areas.
Common mistakes
❌ Forgetting to mark the start cell visited before the loop ✔️ Do this in the Setup section before the While Loop begins
❌ Creating multiple Break S_NeighborInfo nodes for the same ChosenNeighbor ✔️ Place one Break node and reuse its output pins across Steps 5.12 through 5.14
❌ Forgetting to mark the chosen neighbor visited after removing the wall ✔️ If this is skipped the algorithm will revisit cells and the maze will break
❌ Forgetting to push the chosen neighbor onto the stack ✔️ Without this the depth-first search cannot continue forward
❌ Removing the wrong stack entry when backtracking
✔️ Always remove at StackTopIndex — the last entry in the array
❌ Forgetting to connect the While Loop condition ✔️ An unconnected condition will freeze the editor
Expected result
Your GenerateMaze function now:
- selects a random starting cell
- explores the grid using depth-first search
- carves passages by removing walls between cells
- backtracks when dead ends are reached
- terminates cleanly when every cell has been visited
The complete maze now exists in memory inside MazeGrid.
Step 6 — Call the Functions in Order
Now we connect the completed functions back into the Construction Script.
What this step does
This step adds the two remaining function calls to the Construction Script and connects them in the correct order so the full maze is built every time the Blueprint runs.
Instructions
Step 6.1 — Return to the Construction Script
Step 6.1.1 — Open the Construction Script
-
At the top of the Blueprint editor, click the:
Construction Script tab
If you do not see the tab, look in the My Blueprint panel under Functions and double-click Construction Script.
Step 6.2 — Add the function call nodes
Step 6.2.1 — Add InitializeGrid
-
Right-click in empty graph space
-
Search for:
InitializeGrid -
Click:
InitializeGrid
Step 6.2.2 — Add GenerateMaze
-
Right-click in empty graph space
-
Search for:
GenerateMaze -
Click:
GenerateMaze
Step 6.3 — Connect execution flow
Step 6.3.1 — Chain the function calls
Connect the white execution pins in this order:
-
Connect the white execution pin from:
Set RandomStreamto
InitializeGrid -
Connect the white execution pin from:
InitializeGridto
GenerateMaze

Connections recap
This is the complete Construction Script execution chain from start to finish:
Construction Script → Clear Instances (FloorHISM) → Clear Instances (WallHISM) → Clear (MazeGrid) → Set RandomStream → InitializeGrid → GenerateMaze
Verify that every node in this chain has a connected white execution wire with no gaps. A single missing connection will silently prevent the maze from generating.
Data flow:
MazeSeed→Make Random Stream→Set RandomStreamInitializeGrid→ fillsMazeGridwith empty cellsGenerateMaze→ marks cells visited and removes walls
Why this matters
The order must be correct. Each step depends on the previous one:
- old data must be cleared before new data is written
- the random stream must be set before
GenerateMazeuses it InitializeGridmust run beforeGenerateMazeso the grid exists to be modified
If the order is wrong, the maze logic breaks silently — no errors will appear, but the maze will not generate correctly.
Common mistakes
❌ Calling GenerateMaze before InitializeGrid
✔️ The grid must exist before it can be modified
❌ Forgetting to connect one of the function calls into the execution chain ✔️ Blueprint functions only run when the white execution wire reaches them
❌ Adding the function calls to a function graph instead of the Construction Script ✔️ Make sure you are in the Construction Script tab, not one of the function graphs
Expected result
Your Construction Script now builds the full maze in memory every time the Blueprint is compiled or a property is changed in the level.
What You Have Built So Far
At this point, your system can now:
- clear old data on every rebuild
- create a seeded random stream
- create a full grid of maze cells
- find valid unvisited neighbors
- remove walls between connected cells
- generate a complete maze in memory using depth-first search with backtracking
Your maze now exists completely in memory. It is not visible yet — that happens in Part 3.
Up Next
In Part 3, we will:
- read the maze data from
MazeGrid - convert grid coordinates into world positions
- place floor and wall meshes using the HISM components
This is where the maze finally becomes visible.